Friday, March 19, 2010

Windows Azure – How to Use Table Storage.

I am going to create a Windows Azure Application which uses Table Storage to store my TODO Lists or TASKS.  Windows Azure Table Storage is Semi Structured and Query able  Table Storage and its a collections of Entities. These Entity have Primary key and set of Pre defined property.

Windows Azure Table service has two key properties: PartitionKey and the RowKey. These properties together form the table's primary key and uniquely identify each entity in the table. Every entity in the Table service also has a Timestamp system property, which allows the service to keep track of when an entity was last modified. This Timestamp field is intended for system use and should not be accessed by the application.

Table service does not enforce any schema for tables, which makes it possible for two entities in the same table to have different sets of properties.

Steps to create Windows Azure Table Storage.

1) Create Entity Class which is derived from TableServiceEntity.

2) Create a DataContext class which is derived from TableServiceContext, which itself derives from DataServiceContext.

3) Create Windows Azure Table Storage from our Model ( That is our Entity Class).

4) Test it with Local Development Fabric.

5) Publish to windows Azure ( Need to have account ).

Start (Run) VS.NET as an Administrator  and create the  new Cloud service project.

image

Add ASP.NET Web Role. All Web Role needs IIS to run. so we are basically developing ASP.NET Web application .

image

Now add class Template to the project to create our Entity Schema. Which is going to be Model Structure for our Windows Azure Table Storage. This SreeniTodo class defines the PartititionKey, RowKey and TimeStamp system properties required by every entity stored in a Windows Azure table

image

Create Data Context

image

image

image

DataConnectionString: This is the connection string to the Window Azure account, through which we can programmatically access data storage and other functionalities in Windows Azure. This connection string can point to a Windows Azure Account in the cloud as well as local development fabric.

image

Create a User interface to input the Entity  property filed , for sample i am getting only  Work Title and Assigned by

image

image

Once tested in Local Environment now time to publish to Windows Azure. Right click on Project and click publish. logon to your windows azure account create new service and select  Package and Configuration file to deploy.

Now change the Azure storage settings as shown below.

We initially ran our application to point to our local Development Storage. Now we need to point our application to Windows Azure Account.

image

image

image

Next we will see how to use other window Azure Storages Blob and Q .

Nandri(Thanks)

SreenivasaRagavan.

Tuesday, March 16, 2010

My First Windows Phone 7 Application.

First Download Windows Phone 7 Development SDK tools and install. Here is the link where you can download from Microsoft site.http://silverlight.net/getstarted/devices/windows-phone/

Once you installed SDK. Fire up the VS.NET you will see 3 type of project Templates

1) Windows Phone application

image

2) Windows Phone List Application

image

and 3rd one is Class Library Application.  Here i am going to create simple Windows Phone Application which takes two inputs as number and add them.

Here is my XAML code and UI

image

Now run the application

image   image image

I think Microsoft no need to copy Iphone here . Silverlight with Windows Phone 7  IPhone going to face big competition here.

Nandri(Thanks)

SreenivasaRagavan.

Sunday, March 14, 2010

Developing and Hosting Application in Windows Azure

Microsoft Announced Feb 1 2010 Azure Services pricing Model.  To host our application on the Cloud first we need to get Account. so go to

WWW.Microsoft.com/WindowsAzure  click Azure Platform Introductory Special this model offer no cost until Jun 30. click buy button and provided Billing information with CC Information.

Creating Account

image

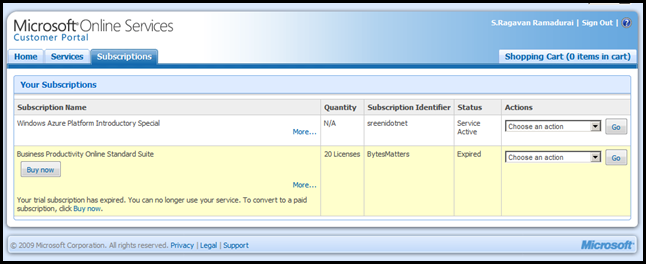
Once you Create the account you get the following Conformation email

Dear S.Ragavan Ramadurai,

Thank you for your purchase of order 180xxxxx541.

If your subscription has not yet been activated, follow these steps:

  1. Sign in to the Microsoft Online Services Customer Portal with the following Windows Live ID: someid@hotmail.com.
  2. Open the Subscriptions page and find your subscription.
  3. From the Actions list for each subscription, select Activate now, and then click Go.

This message was sent from an unmonitored e-mail address. Please do not reply to this message.

Sincerely,
Microsoft Online Services Team

To contact Microsoft Online Services Support, go to online support

Microsoft respects your privacy. Please read our online Privacy Statement

Trademarks
image

Download Development SDK

Once your account is activated now download the Tools and SDK to develop the windows Azure Services.
image

Developing and Hosting

Now i am going to show how to host simple ASP.NET application on Microsoft Cloud OS(Azure).  Microsoft provides AppFabric for  developing  Azure development  in Local machine once test it then move to cloud. This App Fabric installed when  Azure SDK installed.

image

Fire up VS.NET 2010 RC ( you can use VS.NET 2008 SP1) and select cloud Project as shown below ( I am using C# as my development Environment )

image

Windows Azure application Must have at least one Web Role or Worker Role. here i am going to add ASP.NET Web Role. All Web Roles are user facing application but worker role only accept incoming Request no outgoing .

image

Click ok This will create two projects as shown below.

The first project, named SreeniFirstAzureApp, holds the configuration for the  our web role that compose the Windows Azure application. It includes the service definition file, ServiceDefinition.csdef, which contains metadata needed by the Windows Azure fabric to understand the requirements of our application, such as which roles are used, their trust level, the endpoints exposed by each role, the local storage requirements and the certificates used by the roles. The service definition also establishes configuration settings specific to the application. The service configuration file, ServiceConfiguration.cscfg, specifies the number of instances to run for each role and sets the value of configuration settings defined in the service definition file. This separation between service definition and configuration allows you to update the settings of a running application by uploading a new service configuration file.
The Roles node in the cloud service project enables you to configure what roles the service includes (Web, worker or both) as well as which projects to associate with these roles. Adding and configuring roles through the Roles node will update the ServiceDefinition.csdef and ServiceConfiguration.cscfg files.
The second project, named SreeniWebRole, is a standard ASP.NET Web Application project template modified for the Windows Azure environment. It contains an additional class that provides the entry point for the web role and contains methods to manage the initialization, starting, and stopping of the role.


image

Now open the Default.aspx and add some HTML save the file now compile and execute the app.

image 

Now our Windows Azure application under local Development fabric. 

image

Suppose we wanted to run 5 instance of this application just change the Instances value in ServiceConfigration file as shown below.( save the file and run the app)

image

Now local Development Fabric shows there are 5 instances will be running.

image

Publish

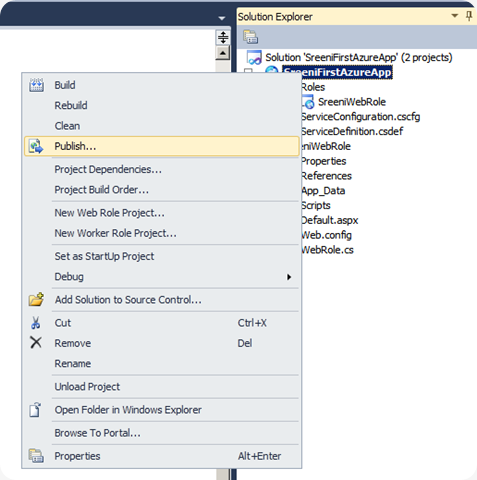
Now we are happy with our Windows Azure application running under local environment now we are ready to publish on the cloud.  To publish or to host on the cloud right click on the project  and click publish as shown below.
image

It opens up IE with Windows Azure Platform site . Now you need to Login to the site with your Windows Live id which is used when creating Azure account. Once you login click create new service.
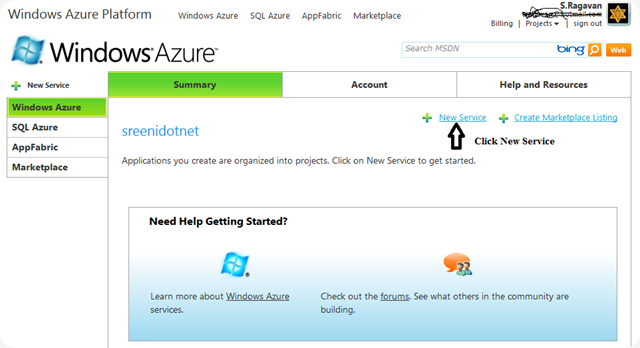
image

The next screen we need to select Hosted Services.

image

Give service Label name and Service Description.

image

I am going to host my service anywhere in the US Region. so select the region and click create.

image

Now it will shows two Environments to deploy our Windows Azure application . Click the Deploy on Staging ( First deploy in staging  right way to deploy  ).

image

when click deploy button it opens up  Windows File Explorer now we need to point the our application directory and select the Application Package file and Service configuration file to deploy.

image

image

Now click to deploy.

image

image

Now our application is deployed and hosted in Windows Azure OS. now we need to start the app just clicking Run button.

Now you will see Initializing…

image

Now it says Busy

image

Now Application is ready to run.

image

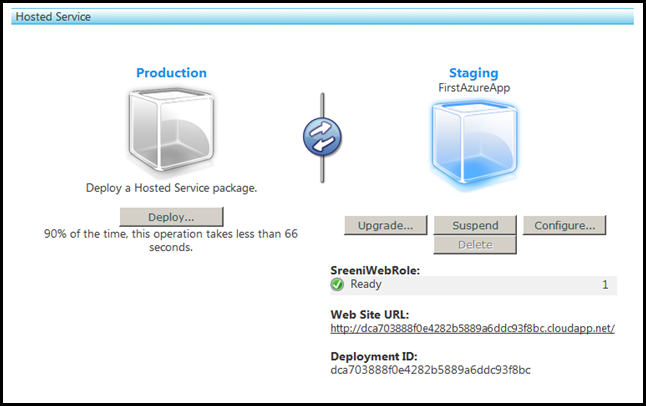
The following screen shot shows my Application running successfully on Staging Environment . when application in staging you get the application URL as some GUID.image

Now i am going to promote my Application to Production just click the following Icon.

Promote from Staging to Production
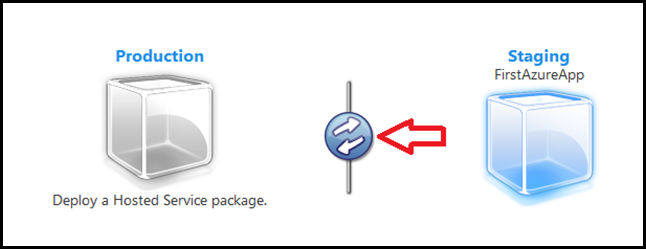
image 

image

Now my application promoted from Staging to Production. Now the application URL will be

http://sreeniramadurai.cloudapp.net/

image

Application runs successfully in production as well.

image

Nandri(Thanks)

SreenivasaRagavan.

Tuesday, March 9, 2010

.NET 4.0 Tuple<T>

In .NET 4.0 there is a new feature called  Tuple. First let us see the definition for Tuple .

What is Tuple?

In mathematics and computer science a tuple represents the notion of an ordered list of elements. In set theory, an (ordered) n-tuple is a sequence (or ordered list) of n elements, where n is a positive integer. [Source Wikipedia]

Tuple is a factory class that provides static methods for creating instances of the tuple types supported by the .NET Framework. It provides helper methods that can be called to instantiate particular tuple objects without requiring that you explicitly specify the type of each tuple component.

Let’s take a look at the following  simple math example.

image

In the above  example i have created a method which returns a Tuple and  which has three Integer values. So using Tuple a method can returns multiple values  without using out parameters.

To access values in aTuple we use ItemN where N is the nth position in a Tuple. In the above example  I am  accessing the  Item1 value that returns me  the first value of num1+num2+num3 from Tuple. like that we can access Tuple values .

Tuple is not new concept the language like Python and Haskell has this feature as well.

Nandri(Thanks)

SreenivasaRagavan.

Tuesday, March 2, 2010

WF 4.0 Creating Custom AsyncCodeActivity

In WF 4.0 all the activities  are derived from Base activity called  Activity . In this blog post i am going to create custom AsyncCodeActivity.

AsyncCodeActivity and AsyncCodeActivity<T> are very similar to the CodeActivity. But AsyncCodeActivity execute Asynchronously and perform long running operations. suppose if you wanted to perform I/O or downloading any content from Web, you should create activity which drives from the AsyncCodeActivity or NativeActivity.

image

Here i am going to build Custom AsyncCodeActivity to retrieve HTML content for the given URL .

C# implementation of Custom AsyncCodeActivity  Source Lines. 

image

To Add Custom Activity Designer to this Activity please refer http://mstecharchitect.blogspot.com/2010/02/wf-40-custom-activity-designer.html. Now we need to test it.

Here I have a List of Web URLs which i need to download  the content (HTML) and save into a  file . To loop through the all URL collections and pass  into custom activity I am going use  ParallelForEach<T> Activity.

image

Now Build the WF as Shown Below and Test it.

image image

Nandri(Thanks)

SreenivasaRagavan.