Tuesday, July 21, 2009

SharePoint 2010 or MSS 2010 Sneak peek

MOSS 2007=> MSS 2010

The next version of Microsoft Office SharePoint Server 2007 will be Microsoft SharePoint Server 2010

What is SharePoint 2010?
SharePoint 2010 is the business collaboration platform for the Enterprise & the Web that enables you to connect & empower people through an integrated set of rich features. Whether deployed on-premises or as hosted services, SharePoint 2010 helps you cut costs with a unified infrastructure while allowing you to rapidly respond to your business needs.[Microsoft].

image

Please visit the following URL  for  more information on  SharePoint 2010

http://sharepoint.microsoft.com/2010/Sneak_Peek/Pages/default.aspx


Nandri(Thanks)

SreenivasaRagavan.

Thursday, July 16, 2009

Very Interesting Statistics about BizTalk Server

Please take a moment to read this statistics . what a great Product from Microsoft  WOW !!!!

I have taken this slide from   http://msdnrss.thecoderblogs.com/ 

Nandri(Thanks)

SreenivasaRagavan.

Monday, July 13, 2009

BizTalk Server 2009 Books

Please visit the following link to know more about the books listed Below.

I have read BTS-2009 SOA Patterns its really good one to have and read. ( Prerequisites  WCF ).

http://msdn.microsoft.com/en-us/biztalk/dd807027.aspx

SOA Patterns with BizTalk Server 2009Pro BizTalk 2009Pro RFID in BizTalk Server 2009 (Expert's Voice in BizTalk)Pro Mapping in BizTalk Server 2009 (Expert's Voice in BizTalk)


Nandri(Thanks)

SreenivasaRagavan

Friday, July 10, 2009

Microsoft SilverLight 3.0 Ready for download

Silverlight 3.0 now available for download . before you  download  you can read what are the new features are added to this version.

What is   ?  

Click here http://silverlight.net/getstarted/silverlight3/default.aspx 

Microsoft® Silverlight™ 3 SDK

http://www.microsoft.com/downloads/details.aspx?displaylang=en&FamilyID=2050e580-f1d5-4040-bb09-e6185591b6b5

Microsoft® Silverlight™ 3 Tools for Visual Studio 2008 SP1

http://www.microsoft.com/downloads/details.aspx?displaylang=en&FamilyID=9442b0f2-7465-417a-88f3-5e7b5409e9dd

Nandri(Thanks)

SreenivasaRagavan.

Wednesday, July 8, 2009

MS Vs Google [JFF]

Today i read a news on  www.zdnet.com , saying that  Google is  ripped the Beta labels off of its Gmail.

for me Just removing  Beta Label from Gmail is not going to be  100 %  Error Free and 100 % reliable ….

So for Fun…..   my views on both MS & Google products.

Search Engine:

GOOGLE – Game Over Once Google Lose Eye’s ( since its search engine). 

BING – BeatIN(G)oogle.

Mail:

GMAIL Google Mails Are In Loss

HOTMAILHaving One of This Mail Account will keep you In Live ( Live.com).

Operating system.


CHROME -  Cannot Host  the Rhythm  OMicrosoft windows Environment.

Finally,  A House can exists without CHROME but not without WINDOWS.


WIN’s always and Do Offers Wonderful Service.

Nandri(Thanks).

Sreenivasaragavan

Tuesday, June 30, 2009

97 Things Every Software Architect Should Know


  I would like to add 3 more to make it 100.   Once i finish reading all 97 i will come to know what is missing then i will add those required points to  make it 100 ==Perfect .

image

http://97-things.near-time.net/wiki/97-things-every-software-architect-should-know-the-book

Nandri(Thanks)

SreenivasaRagavan.

VS.NET 2010 Modeling a Project.

In VS.NET 2010 Team Suite Beta 1 Edition we have new project type called Modeling Projects. This modeling projects help us to model or create  our Data , Activity , Use case, Sequence Diagram, Logical Class Diagram etc…

The above models are Represented as UML Models.  Let me show you how to create the Logical Class diagram using this Modeling Project .

Step 1: Create New Modeling Project.

image

Right Click and Add new Item then add Logical Class Diagram from the available modeling template.

image

Here i am going to add sample user class with few attributes and Operations. 

Now you can right click  on the UML design surface or drag and drop a Type from Toolbox .  let us right click and Add Class Type and Name that type as User.

image

Now right click on Class (User) Type and Add Attribute and send the Properties for that attributes like Type (string, bool ), Visibility (Private ,public) image

same way now we are going to add Operations and set  the Properties like  Return Type as shown below.

image

UML Representations of a User Class.

 image

I just exploring VS.NET 2010 Team Suite Beta 1. I will keep posting stay tuned

Nandri(Thanks)

SreenivasaRagavan

Sunday, June 21, 2009

Model First Development using VS.NET 2010 Beta 1 & Entity Framework

Until VS.NET 2010 Bea1 Released we have been creating our model from Existing Database. Now we are going to take the route  from Model First then Create our Persistence  Layer or Database.

Step1 :  First Create ASP.NET Web Application  ( you can use other .NET project as well).

image

Step 2: Now add ADO.NET Entity Data Model to the project we just created above.

image

Now the  Entity Data Model Wizard will gives two options in that now we are going to select Second option called Empty Model

(VS.NET 2008 SP1 this options was there but it was not working)

image

Now we can start creating our Entities and Define the Relations among them.

image

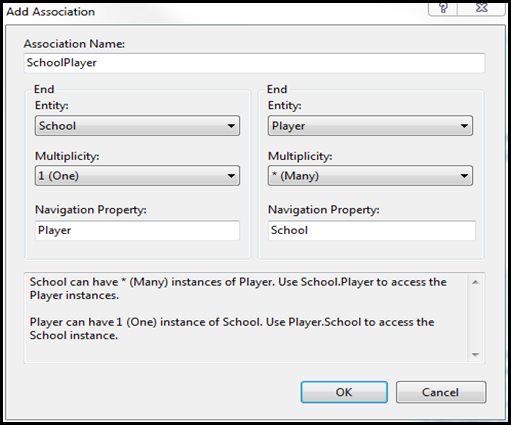
Now Right click on the  Design surface and start adding entity and properties and type. Here for the heck i am taking simple example School , Player, Game et..

I am going to create the 4 Entities namely   SCHOOL, PLAYER, GAME, STADIUM and Define the relations between them.

image image


image

Now we have Created our Entities ,their properties and relations. now time to generate  database for our model to map to. This is what  i like Microsoft  IDE and tools so simple to create and Develop. Now Right click on the model designer area and click “Generate Database Script From Model… as shown above.

Now you will asked to select   DB Server name.[ The standard database connection dialog we are all used to in Visual Studio when  Adding a connection]image
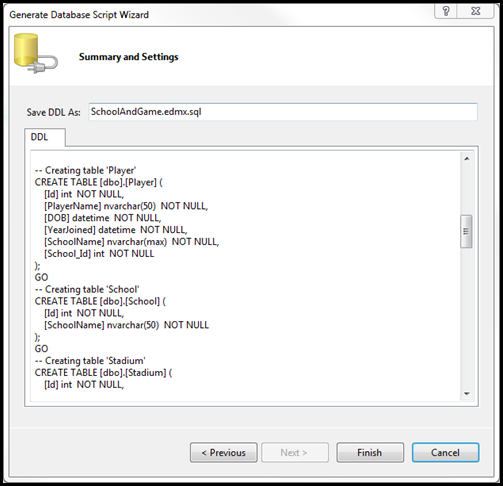
Now you need to cut the generated script and paste into SQL server Management Studio and execute it against your database.  The database itself will have been created, but in this beta version you still need to execute the scripts manually.  This will not be the case in the final version of VS.NET 2010.

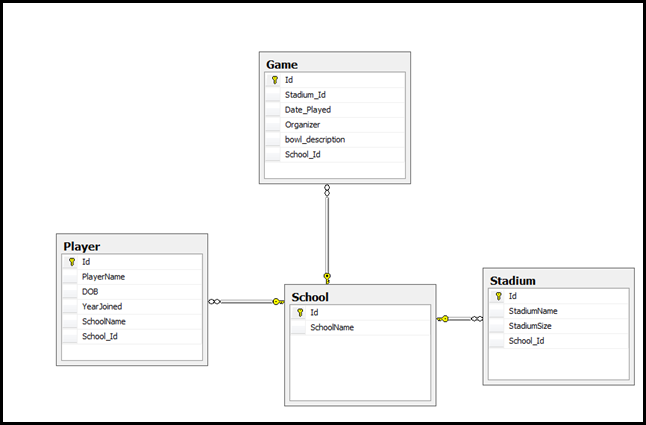
Here is the Relational Model
image

Nandri(thanks)

SreenivasaRagavan

Monday, June 15, 2009

Monday, June 1, 2009

ADO.NET Data Service CTP V 1.5 new feature –$count [ Row Count]

In ADO.NET Data Service  CTP V1.5 we can query the  Entity records count before downloading the whole entity using  $count .

1) Create ASP.NET Web Application.

2 ) Add ADO.NET Data Service Template .

3) Now we need to define/Create our Data source which we need Surface via ADO.NET  Data Service .  Here i am going to use  Customer ,Order tables  from North wind DB as my  entity .

Now  Add  ADO.NET Entity Framework model template to the project and follow the  Wizard .

image

Now we need to add manually the following two References from  the directory where  ADO.NET Data service CTP V 1.5  installed . [ Note: Remove old Version 1.0  Reference System.Data.Services, System.Data.Services.Client before adding new version]

The above step is very important, otherwise you wont able to use $count operator .

image

using System;
usingSystem.Collections.Generic;
usingSystem.Data.Services;
usingSystem.Linq;
usingSystem.ServiceModel.Web;
usingSystem.Web;

namespaceNewDataService
{
    public classWebDataService1: DataService<NorthwindEntities>
    {
         public static voidInitializeService(IDataServiceConfiguration config)
        {
             config.SetEntitySetAccessRule("*", EntitySetRights.AllRead);
        }
    }
}

After paramterizing the DataService browse the .SVC 


image 


Now in Brower Address bar type the following rest URI.


http://localhost:51204/WebDataService1.svc/Orders/$count 


image 


The result of the above REST URL   tells Orders Entity has 830 Records.


Nandri(Thanks)


R.Seenivasaragavan.

Entity Framework 4.0 –DeferredLoadingEnabled property.

When you query for columns in a table , you actually retrieve only the columns from the table you requested. The related tables (Linked/Associations tables ) are not automatically fetched at the same time. suppose you might want to query a customers and a particular set of orders for that customers . you can do this by joining customers and orders in a query by forming the cross-product and retrieving all the relative bits of data as one large Record set. But these results are not entities.  when we use LINQ To SQL we can achieved this but     In Entity Framework  we do not have this options. Now with Entity Framework 4.0 we have it.

setting up the DeferredLoadingEnabled is true in context options

Here is how we can do this.  let us create EFM (Entity Framework Model)  from the well know DB called North wind. here  i am going to use  Customer and Order tables .

image 

The above Entity diagram shows  Customer and Order  relationship is  0 to many.

Now we will query the customer table and display the result on the webpage  with out enabling DeferredLoadingEnabled .

protected void Button1_Click(object sender, EventArgs e)
{
using (NorthwindEntities conn = new NorthwindEntities())
{

var query = from cust in conn.Customers
where cust.Country.ToUpper() ==
"USA"
select cust;


foreach (var item in query.ToList ())
{
Response.Write("Customer ID : " + item.CustomerID + " Total Number of Orders :<b> " + item.Orders.Count.ToString()+"</b></br>");
}

GridView1.DataSource = query.ToList();
GridView1.AutoGenerateColumns = true;
GridView1.DataBind();
}
}


image


Now we will query the customer table with DeferredLoadingEnabled  is set to ture.


protected voidButton1_Click(objectsender, EventArgs e)


      {


          using(NorthwindEntities conn = newNorthwindEntities())


          {


             conn.ContextOptions.DeferredLoadingEnabled = true;


              var query = fromcust inconn.Customers


                          wherecust.Country.ToUpper() ==
"USA"

                        
selectcust;


              foreach (var item inquery.ToList ())


              {


                  Response.Write("Customer ID :  "+ item.CustomerID + "    Total Number of Orders  :<b> "+ item.Orders.Count.ToString()+"</b></br>");


              }


              GridView1.DataSource = query.ToList();


              GridView1.AutoGenerateColumns = true;


              GridView1.DataBind();


          }


      }


after setting the DeferredLoadingEnabled  =true  the query able to bring corresponding order for each customer .


image


Nandri(Thanks)


SreenivasaRagavan

Sunday, May 31, 2009

WF 4.0 New Activities Tour.

In Windows Workflow 4.0 we see lot of new activities image. i just wanted to show you how to use them in series of Blog post.

ForEach /ForEach<T>:

ForEach activity contains a list of Values and a Body. At runtime, the list is iterated and the body is executed for each value in the list.

image

I created the variable called names as a array of string  with the following default values as shown below.

image 

using ForEach activity i loop through the names.

image 

Sequence :

The Sequence activity allows for the execution of one or more Activities in order.  in the above example  inside the Sequence Activity i placed ForEach and WriteLine activities .

image

Assign :

The Assign activity assigns the value of its Value argument to its To argument. The types of both arguments must be compatible. This compatibility is verified at runtime. 

Create a counter variable use assign activity to increment the value . 

image

IF :

The If activity selects a child activity for execution based on the value of a Boolean expression.

If the Boolean expression Condition yields True  “Then” activity is executed. If the expressions yields False  “Else” expression is executed.

image


While:

The While activity executes it's Body while a Boolean Condition is True.

image

Nandri(Thanks)

SeenivasaRagavan

Saturday, May 30, 2009

Creating Flowchart Workflow in WF 4.0


Flowchart workflow is a new type of Hybrid workflow in  WF 4.0. In this work flow we can able to use all type of  WF 4.0 activities.

In this Flowchart workflow i am using  FlowDecision activity to make Decision .

Flow Decision  activity contains a Boolean expression Condition. If the expression evaluates to “True”, the true path is executed otherwise, the false path is scheduled

image

This expressions are written in VB!. This means capitalization does not matter, comparison is performed using a single equals sign instead of “==”, and the Boolean operators are the words "and" and "or" instead of the symbols "&&" and "||". [I think in feature we will able to edit in C#]

.

Next i am using my Custom activity for to read user input from console . [ please refer my pervious blog post how to create custom activity http://mstecharchitect.blogspot.com/2009/05/creating-custom-activity-for-reading.html]

image


In this  Flowchart workflow i am giving an  example of Bank Account creation.  First i will greet the customer then ask customer to choose what type of account they wanted to create.  Once  customer input is read then using  Flow Decision  activity   i am checking  C for Checking  and S for Saving account.

accType.ToUpper() = "C" [ expression to validate or check user input ]

if Input is C then create checking account and assign customer checking account number print them and say thanks and start the workflow from start.

if Input is  S then ask details for to create a saving account. Here i am asking a questions to customer saying that what is your favorite  Search engine ? B-Bing  & G-Google.  if customer input was B then create a Saving account and assign account number print them and say thanks.  if customer input is G then i print a message saying that "Wait for Google to Open a Bank"

In this project i have defined the following list of variables  as shown below.

image

Here is the Flowchart workflow in WF 4.0 designer.


image


Nandri(Thanks)

R.SeenivasaRagavan

Friday, May 29, 2009

Creating Custom Activity for Reading Input from User [Console] in WF 4.0

In WF 3.5 we use Dependency Property to set Input and Output variables to the workflow.  Now in WF 4.0 there is no more Dependency Property.

Dependency Property is Replaced with  InArgument and OutArugment. In this Blog post  I am going to write Custom Activity using  OutArgument to read input from user.

Step1 : First Create Activity Library Project.

image

Step2 : Add WrokflowElement Template to the project.

image

Step3: Add Public property OutPut and  Override the  Exectue Method as Shown below.

namespace GetInputFromUser
{
using System;
using System.Collections.Generic;
using System.Linq;
using System.Text;
using System.Activities;
using System.ComponentModel;

[Designer(typeof(SreeniGetInputFromUser))]
public class GetInput : CodeActivity
{
OutArgument<string> outputString;
public OutArgument<string> OutPut
{
get
{
return outputString;
}

set
{
outputString = value;
}
}
protected override void Execute(CodeActivityContext context)
{
string userInput =Console.ReadLine();
context.SetValue(outputString, userInput);
}
}
}


Step4 : Now we are going to add Designer to our Custom Activity  so that it looks good when we add this activity into other Workflow applications.


image


Using XAML you can add Good Look and Feel of the custom activity


image


Step 5: Now add new Sequential workflow console application and Add  Reference as this custom activity project  and starting using custom activity inside newly created Sequential workflow Project.


image


once you finishing the workflow Press F5 to execute.


image


Nandri(Thanks)


R.SeenivasaRagavan,