Saturday, May 29, 2010

Silverlight 4.0 <=WPF --ICommand

Now Silverlight 4.0 Supports ICommand  Interface but not fully only two controls

  1. Button
  2. Hyperlink button.

In Silverlight 4.0 the Button UI Element has to extra properties Command and CommandParamter.

 image

Here i am going to show simple example using ICommand Interface in Silverlight 4.0.

First create a Silverlight application. 

image

Now we need to Add Class file to the project and Implement the ICommand Interface.

image


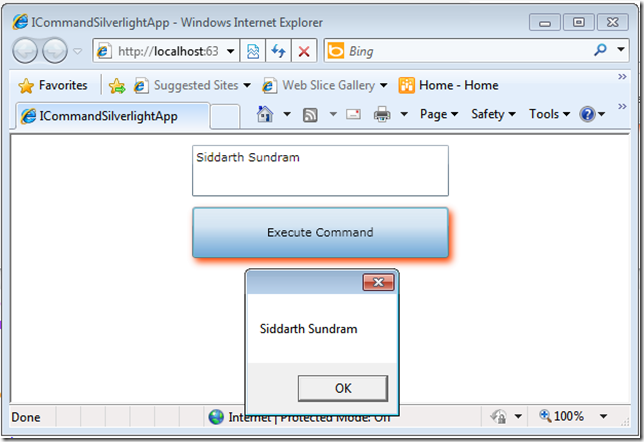
Here the above code we are checking if user did not enter anything in textbox we are not executing the command . If He /She enters something and click button we will display the Entered Text in MessageBox.

Now lets Add XAML code to create Simple UI .  Here i am adding one Textbox and Button.

image

Now lets do the Binding (wire up) our Command class to this UI.  Here i am doing Element to Element data binding.

image

Note:

I do not have any code in CodeBehind in MainPage.Xmal.cs for the Button Click.

image

Now run the application and click Execute Command Button and see what is happening after that put some text in text box and click it now the message box displayed the text which you entered.

image

Nandri(Thanks)

SreenviasaRagavan.

Enabling OData Endpoint When Creating WCF-RIA Services

image


When you create a WCF RIA Service using VS.NET 2010 we can easily enable OData endpoint as well.  This can be done just clicking Check-Box. First let see in Action. First create a silverlight application and do not forgot to check Enable WCF RIA Service Check-Box as shown below.

image

Next we need to add/Create Model which will  expose via WCF-RIA Services. We can create Model using EF or LINQ to SQL .  Once you create the model just compile the project so that VS.NET IDE knows the changes we made to our project. (This compilation needed to show Entity  when we create RIA services ).

Next step is to Add Domain Data Service template to our project so that we can create WCF RIA Services .

image 

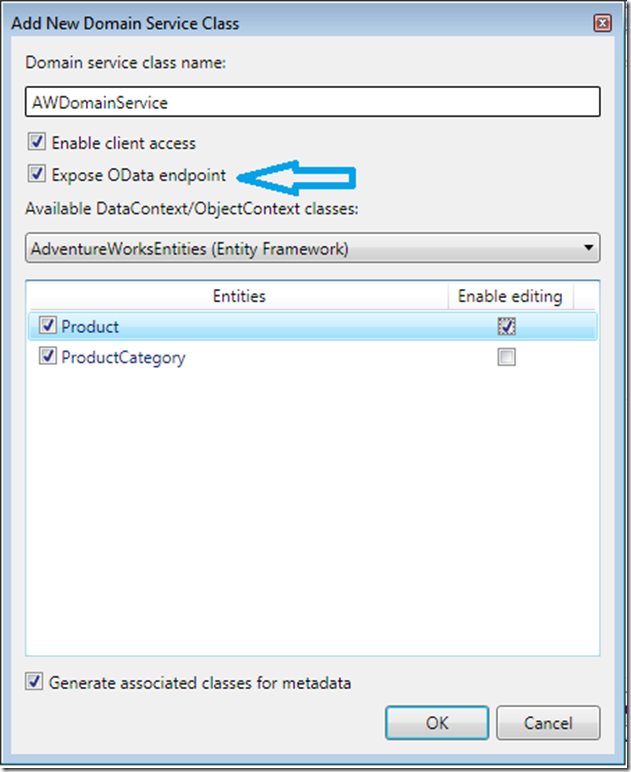
If you see the below dialog  box we have an options to check and expose the OData Endpoint. 

image

When you check the Expose OData endpoint Check-Box the following changes were made to your project.(Web Project).

1) The following OData endpoint added to your web.config file

image 

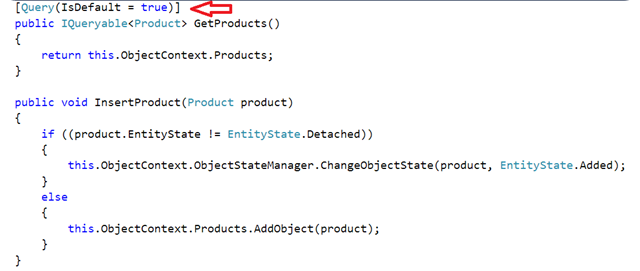
2) Next on  each paramaterless query methods  marked [Query[IsDefault=true)]  attribute

image

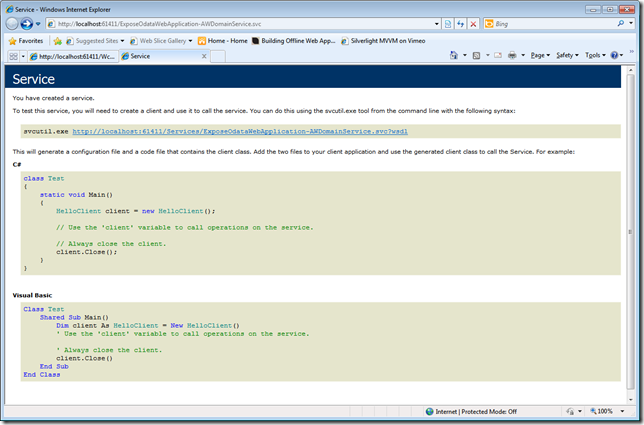
That is it now compile the project and browse the endpoints from IE. Here WCF RIA Services are created @ runtime you do not find  .SVC file  ( it is created by virtual provider). To access WCF RIA SERVICE and OData Endpoint  here is the URL format which we need to construct .

http://ServerName:portnumber/Projectname-DomainService.svc.  in my case i am running @ local machine so the WCF RIA SERVICE Endpoint is

http://localhost:61411/ExposeOdataWebApplication-AWDomainService.svc

image

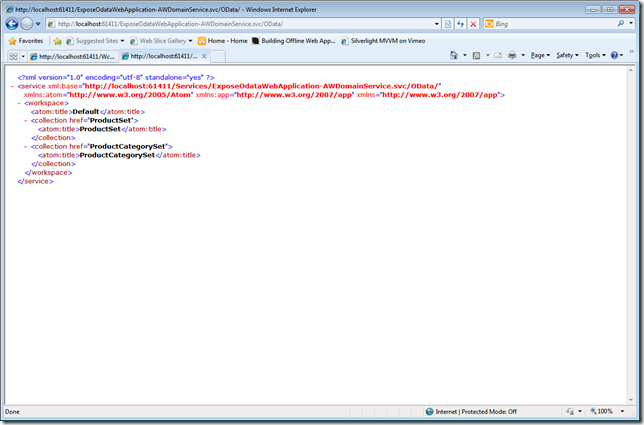
and OData Endpoint is http://localhost:61411/ExposeOdataWebApplication-AWDomainService.svc/OData/

image

if you browse http://localhost:61411/ExposeOdataWebApplication-AWDomainService.svc/OData/ProductCategorySet

image

Nandri(Thanks)

SreenivasaRagavan.

Exposing Data using OData protocol and Consuming it using Excel [Power Pivot]


MS Renamed  ADO.NET Data Service => WCF Data Service this service exposed using OData Protocol  OData means Open Data protocol . here is the some of the MS products uses this OData including: SharePoint 2010 (Lists), SQL Server 2008 R2, PowerPivot, Windows Azure Table Storage

First Create ASP.NET Empty Web application project.

image

Now we need to add or create our Model Here i am going to use LINQ to SQL. We can use ADO.NET Entity Data Model as well. Now Select LINQ to SQL Classes template and add to our ASP.NET project. LINQ To SQL Template provides Designer surface where you can drag and drop the DB tables which you wanted to expose as WCF Data Services ( OData).

image

Once Model is created next we need to WCF Data Service template to our project.

image

Next we need to open WCFdataService1.cs file and Add our LINQ TO SQL DataContext class  and Edit the SetEinittySetAccessRule config .

Here i wanted to expose all the Entity so i provided *.

image

Now compile the project and Browse the .SVC

image

Here below query shows how to access all the records from Departments.

image

Now we have successfully exposed our WCF Data Service (OData) . Next we will consume this Data service from Excel using Power Pivot Add-in. first we need to download Power Pivot and install.

Now fire up Excel 2010 you will see Power Pivot Ribbon tab click that.

image

Next Click Power Pivot window and click From Data Feeds ( Our services expose Atom pub)

image

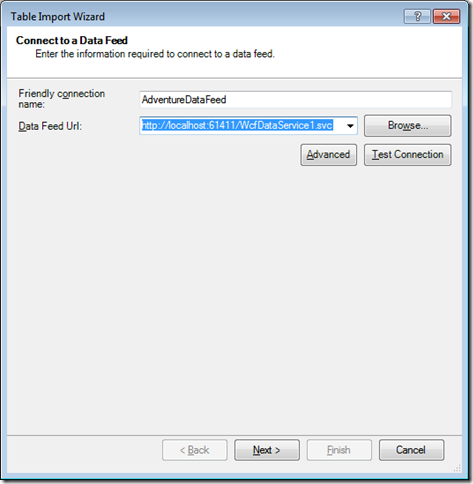
Next Edit friendly name for your Data Feed and provide the Data Feed URL in my case the service is Hosted and running in my local box so my URL will be http://localhost:61411/WcfDataService1.svc. to verify the service is running  you can click Test Connection button and check.

image

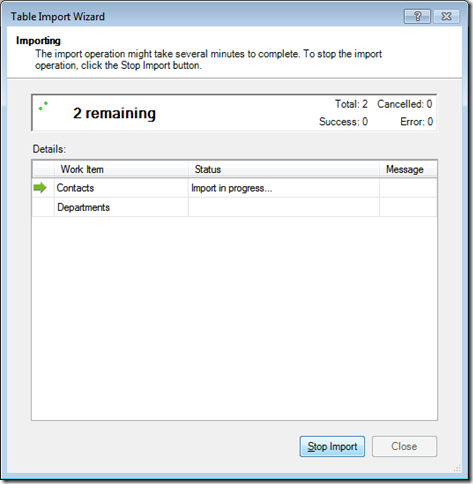
Once you have done that then click next . at this point Excel power pivot connects  service  and gets all Data.

image

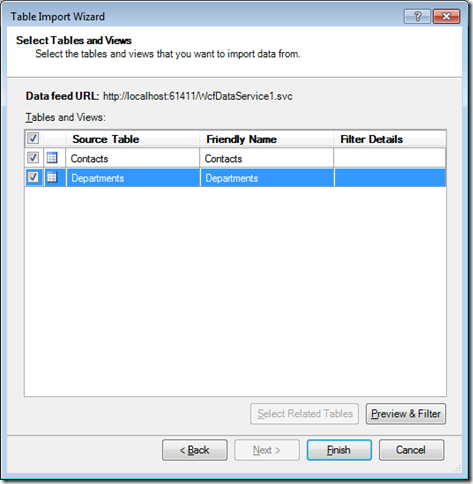
Next select the Tables you wanted to import and click Finish .

image

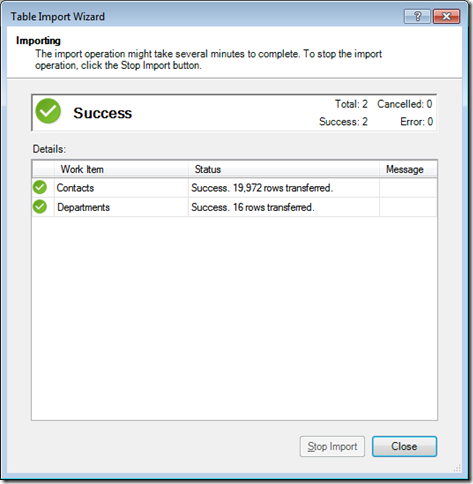
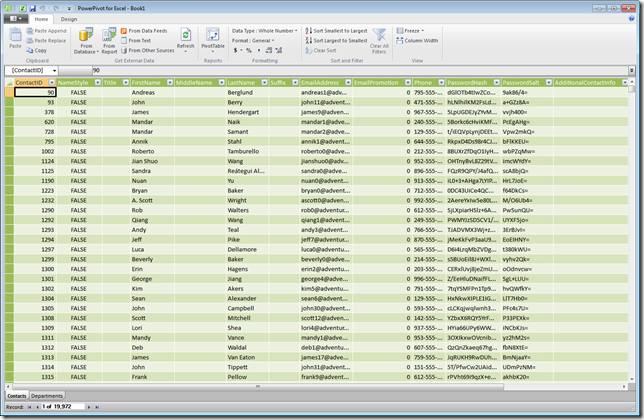
Here is the final result .it tells how may rows are in each tables.

image

Now we have all the Data in Excel . Since most of them knows how to work on excel  they can do all BI related stuff.

image

You can do all Filter , sorting etc…

Nandri(Thanks)

Sreenivasaragavan.

Friday, May 28, 2010

MVVM –Model-View-ViewModel Design Pattern


Design Patterns: In software engineering, a design pattern is a general repeatable solution to a commonly occurring problem in software design. A design pattern isn't a finished design that can be transformed directly into code. It is a description or template for how to solve a problem that can be used in many different situations.

What is MVVM?

It’s an architectural pattern created by John Gossman from WPF team.

MVVM is Model-View-ViewModel Design pattern .But this is different from Common Design pattern which is created by GOF (Gang  Of Four) The four authors were Erich Gamma, Richard Helm, Ralph Johnson and John Vlissides

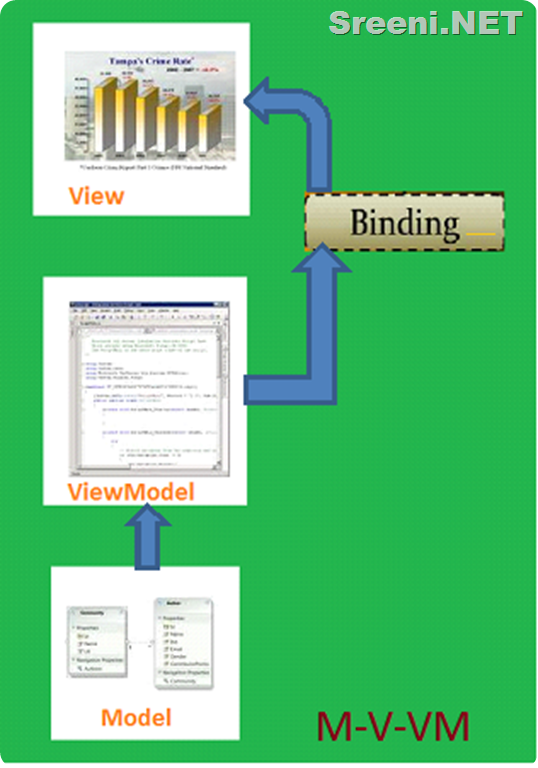
Model => Holds the Data.

View => Presents/Shows the Data.

ViewModel =>Holds the Models which is Presented/Showed in a View. 

When we are building WPF or Silverlight applications is better to use MVVM pattern because this pattern offers the following benefits.


  1. Testability ( ViewModel is easier to unit test than code-behind or event driven code)
  2. Clear separation between UX designer and developer
  3. Increases the "Blend ability" of your view
  4. Model never needs to be changed to support changes to the view
  5. ViewModel rarely needs to be changed to support changes to the view
  6. No duplicated code to update views

The Important is  MVVM  makes uses of  Silverlight & WPF Binding.
image

Here I am going to show how to use MVVM pattern when building Silverlight application. Here i am not going to use any framework tooling. Here is the workflow I am going to follow.

  1. Create a Silverlight Application.
  2. Create Model, View,ViewModel Folders.
  3. Add or Create a Model class with some properties . Here I am going to create Custom class. ( we can use EF , WCF  etc..).
  4. Implements INotifyPropertyChanged Interface.
  5. Create ViewModelBase and ViewModel Classes.
  6. Create a View.
  7. Do the Binding.

First Fire up VS.NET 2010 and Create a Silverlight Application Project.

image 

Once project is created now we need to add the following  Model , View , ViewModel folders as shown below.

image

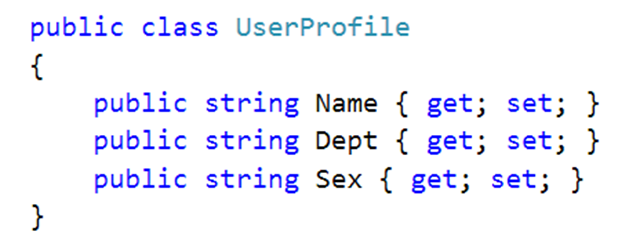
Now we need to create Model. To do that right click on Model Folder and Add the class called UserProfile and add the following public properties as shown below.
image 

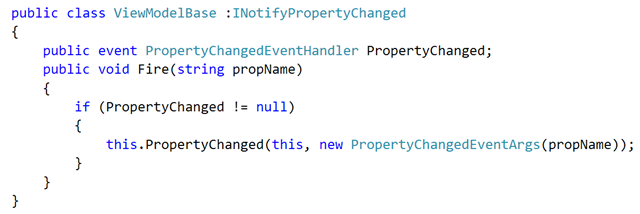
Now right click on ViewModel folder and add the following classes.

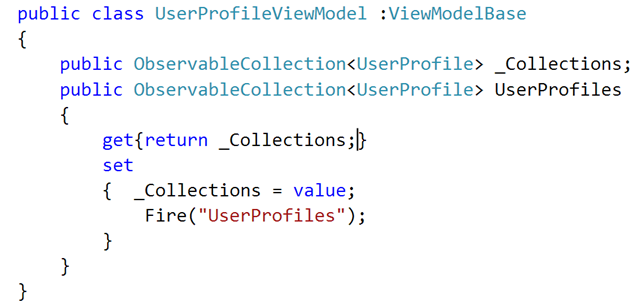
This viewModelbase class just implements the INotifyPropertyChanged Interface this way both source and Target objects are in Sync.
image

The ObservableCollection class automatically implements  INotifyPropertyChanged Interface.
image

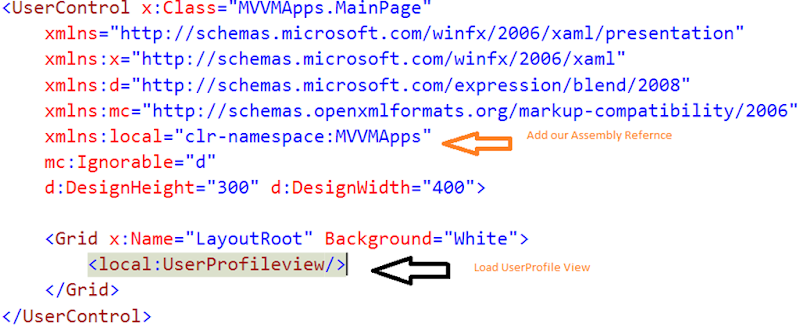
Now right click on View Folder and add the Silverlight Usercontrol name it as UserProfileView.XAML And add the following XAML code

image

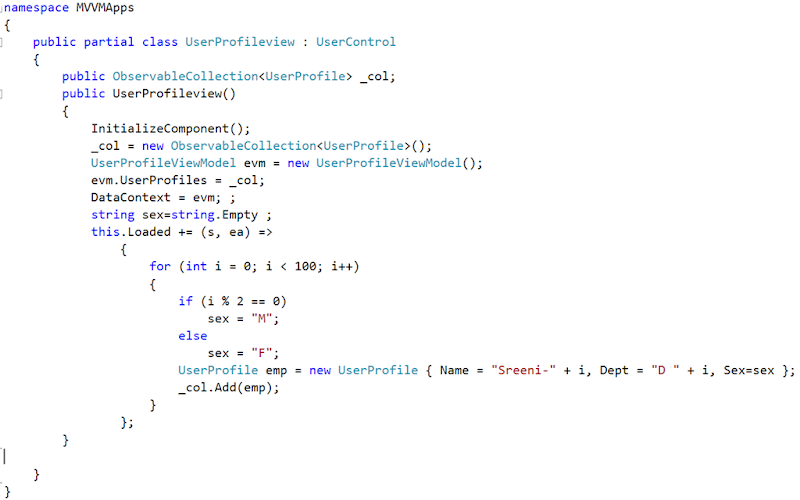
And add the following code in the UserProfileView.XAML code behind.
image

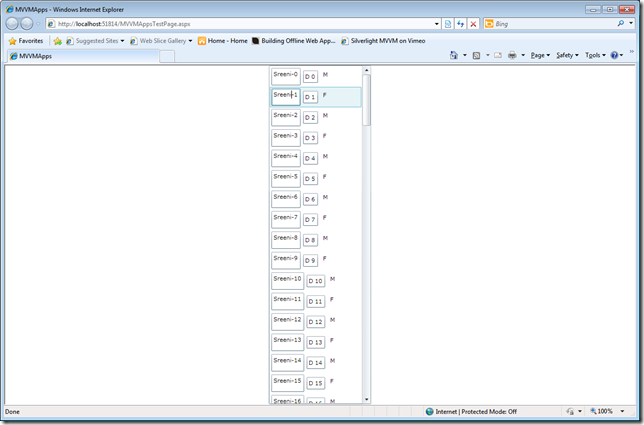
Here i am creating 100 user profiles and adding to ObervableCollection and setting to UserProfileViewModel class and setting Datacontext.
image

image

I hope i explained MVVM pattern very simple and everyone can understand easily . Here i used Properties binding even we can use ICommand as well  (Silverlight 4.0). I am happy to answer this blog readers questions.

Nandri(Thanks)

SreenivasaRagavan.

Thursday, May 27, 2010

My Article Published on DIWUG SharePoint Magazine.


Please download the second issue of SharePoint eMagazine. @ http://information-worker.org/freemagazine.aspx

My Article Title is Incorporating External Data in SharePoint 2010 using WCF - Raghavan Ramadurai

image

Nandri(Thanks)

SreenivasaRagavan.

Printing In Silverlight 4.0

In silverlight 4.0 the main API for printing is PrintDocument class which lives in System.Windows.Printing namespace. Here are the steps we need to do  for a Printing.

1) First Create instance of  PrintDocument class.

2) Next Implement the PrintPage event handler and  Set PageVisual to the UIElement you want to print.

3)  Finally call Print() method.

This is very easy way to print this is same as screen printing.

let see in action

First Create Silverlight application project.

image 

In the Next Dialog box we just say click OK .

image

now lets add some XAML code to build UI with some Text and try to print them.

image

Here is my GUI with some sample Contact Lists.

image


   Event handler to handle Printpage event.

     Here i am  using Lambda Expression (C# 3.0)  basically the down rectangle code replaced by the above Rectangle  Lambda Expression.

image

image

Nandri(Thanks)

SreenivasaRagavan.
Thursday, May 20, 2010

Developing Master/Details Application In SilverLight

In this Blog post I am going to show how to create a Silverlight application Master/Details Records display. First Open of the VS.NET 2010 and create Silverlight application project.

Creating a SilverLight Application Project

image

     In this application we are going to use WCF RIA services to bring Data from Backend so we need to check the  Enable WCF RIA Services Check-Box. and then click ok.

Enabling WCF RIA Services


image[52]

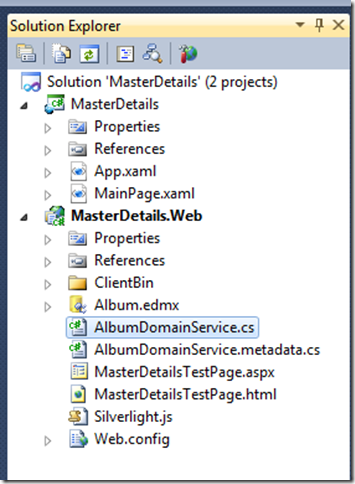
At this point VS.NET will created two projects.  One is Silverlight Client application project and another one Web application project as shown below.

image

Adding EF Model

Now we need to add Data Model to our project. Here we can use either LINQ TO SQL or EF. But I am going to use  EF Data Model Template. so let us add  ADO.NET Enitity Data Model template to this project and follow the Wizard.

image

   Here I am going to use Chinook Sample Database which you can download from CodePlex. Next we are going to select an option Generate From Database and create the EF Model.

image

Once EF Model created successfully at this point we need to compile or build our project so that VS.NET will get latest changes or additions that we made  in our solution. This build process helps to choose Entities when we are creating Domain Service. 

Adding Domain Service Class

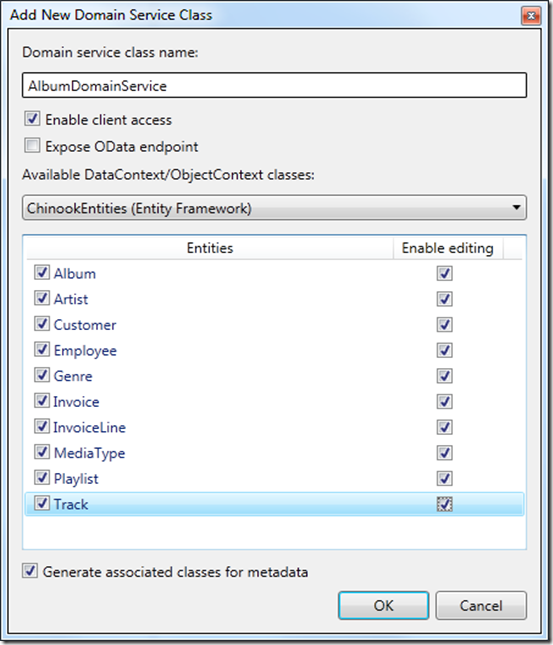
Now we need to add Domain Service template to our project to create WCF RIA Service. Here we asked to select the Entities which we wanted to exposes to client side and can perform CURD operations . having said that Here I am selecting all Entities and also enabling editing option as shown below. And do not forgot to check the options which will Generate metadata for our EF classes.  

image

image

   Now once again we need to compile or build the project at this point VS.NET generate DomainContext and Entities on client side. (WCF RIA Service tool magic).

  Here we need to add some UI to display Customer and their Invoices. To do click on Data Sources and right click on Customer and select DataGrid and drag and drop it on  Mainpage.xmal Designer surface. do the same steps for Invoices as well.  At this point we have two Datagird. Here whenever user select customer Record we need to display related invoices in another DataGrid called Customer Invoices.

Creating UI


image


  Adding [Include Attribute]

     To bring right data from backend we need to modify our Entity Metadata class as shown below.


image


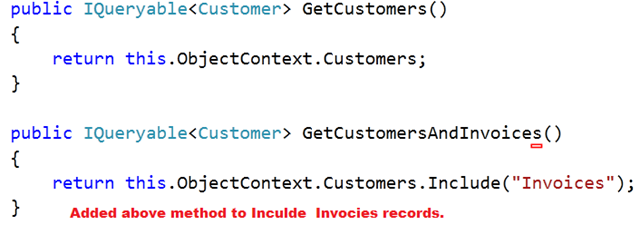
      Here I have added another method which will returns both Customer and their invoices records .

image


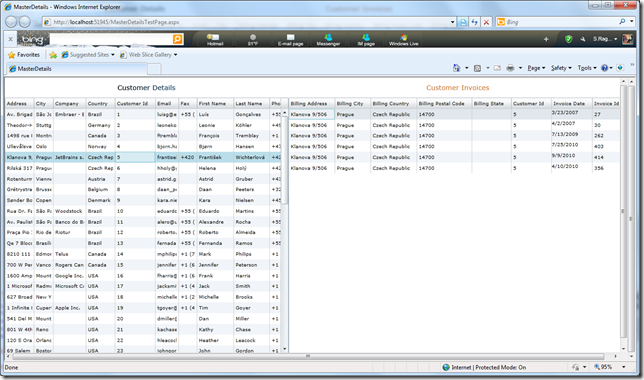
  Now build the project and Run . Now if we select a record or row in Customer DataGrid the related invoices records are displayed  in Customer Invoices datagrid.

image

Next blog post will see how to Add Busy Indicator when loading Data, Sorting and Grouping of the Data.

Nandri(Thanks)

SreenivasaRagavan.