Tuesday, March 30, 2010

Using Microsoft OData Protocol (formerly Known as ADO.NET Services) to expose our Data.

OData – Open Data Protocol is developed by Microsoft to be an open standard for exposing the data across Internet. This is OData protocol is based on REST and JOSN.

Where OData  protocol is used?

  1. SharePoint 2010 ( ListData.Svc)
  2. Windows Azure
  3. The Project code name Dallas

In Microsoft.NET  we can expose database through OData Protocol using WCF Data Service (FKA : ADO.NET Data Services).

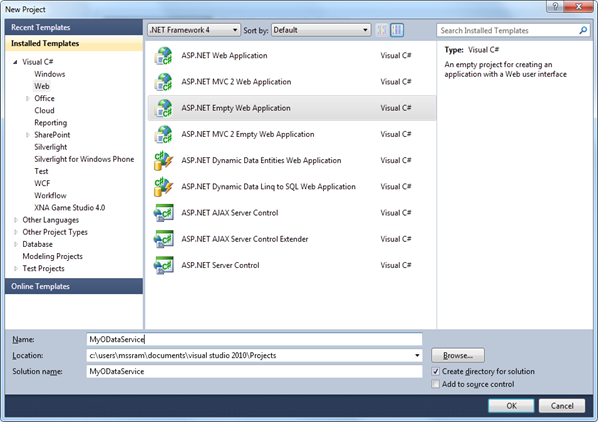
First Create Empty ASP.NET Web Application project.

image

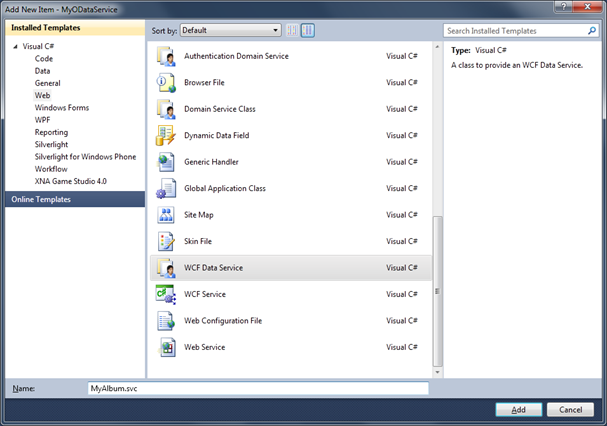
Add WCF Data Service Template to the newly created ASP.NET Web Application.

image

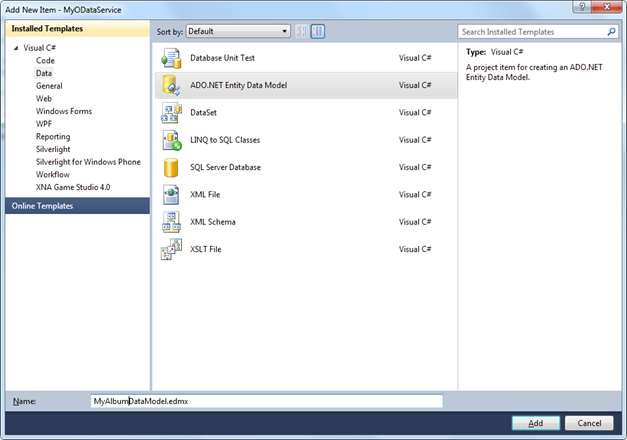
Now we need to Create our Data model which we are going to expose via OData. Here we can use LINQ to SQL or EF ( Entity Framework).

Here I am going to sue Entity Framework.

image

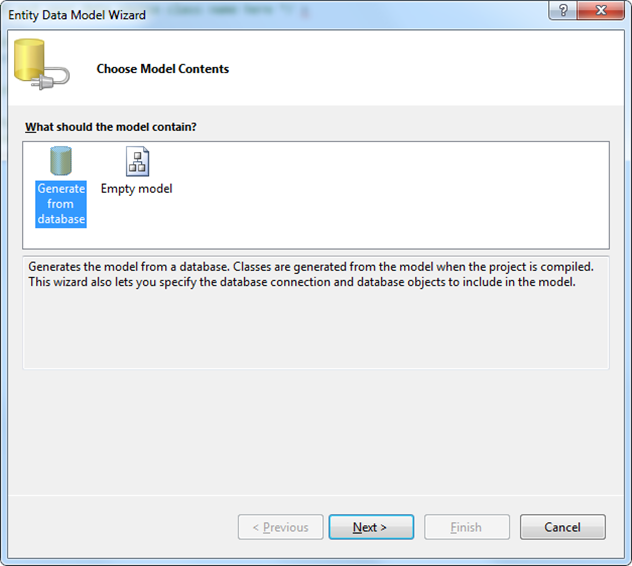
We are going to generate our model from existing Database.

image

    Provide the DB connection string Information.

image

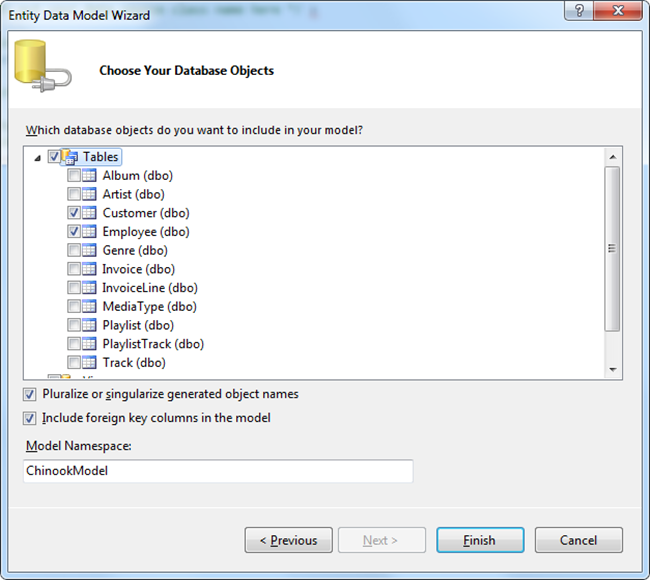
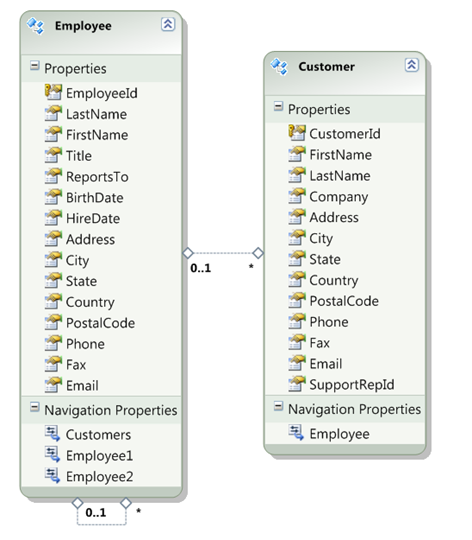
Select the Tables you want to add to our Model.

image

image

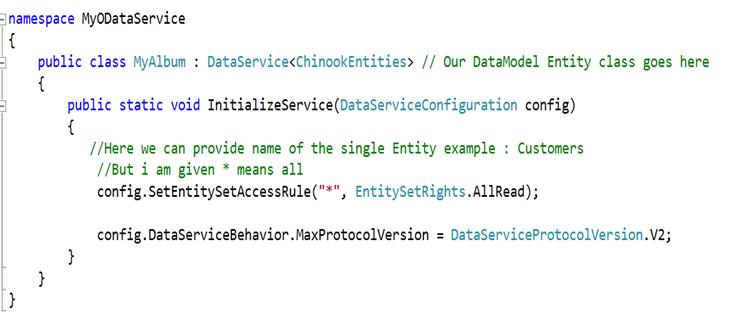
Set Entity permission. Here I am setting all entity have Read access.

image

   Now hit F5 before that set start or up page as MyAlbum.svc.

image

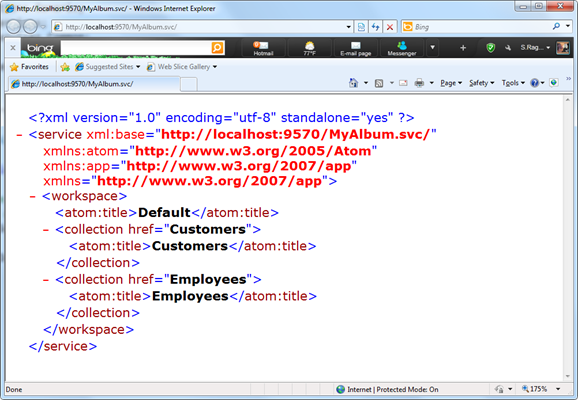
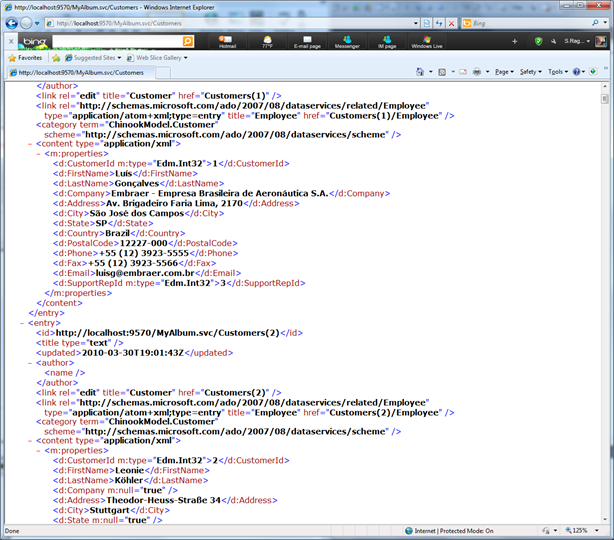
Using REST API format we can access or query the Data . for example to get all customers Data we cause use the following REST URI

http://localhost:9570/MyAlbum.svc/Customers 

image

Nandri(Thanks)

Sreenivasaragavan.

Sunday, March 28, 2010

Calling WCF Service (Hosted in SharePoint 2010) From Silverlight client .

In My previous blog post  I showed how to host custom WCF service inside SharePoint 2010. In this blog post we are going to see how to consume the same service from SilverLight client. here is the link which talks about how to host custom WCF Service in SharePoint 2010 http://mstecharchitect.blogspot.com/2010/03/hosting-wcf-service-inside-sharepoint.html.

Here are steps we are going to follow.

  1. First Create a new SilverLight Project.
  2. Add WCF Service Reference.
  3. Call the WCF Service.

Step 1:

First Fire up VS.NET 2010 and Create SilverLight Application project.

image

Step 2:

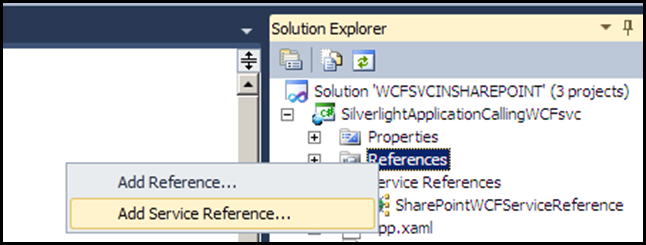
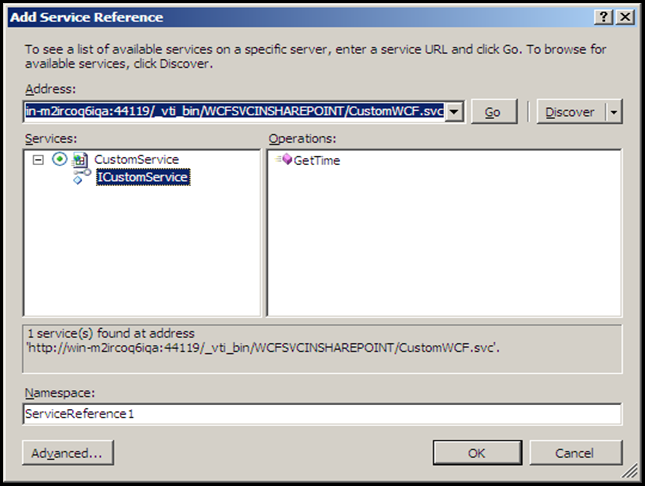
Now add WCF Service Reference to newly created SilverLight project.

image

image

Step 3:

using System;
using System.Collections.Generic;
using System.Linq;
using System.Net;
using System.Windows;
using System.Windows.Controls;
using System.Windows.Documents;
using System.Windows.Input;
using System.Windows.Media;
using System.Windows.Media.Animation;
using System.Windows.Shapes;

namespace SilverlightApplicationCallingWCFsvc
{
    public partial class MainPage :
UserControl
   
{
        public MainPage()
        {
            InitializeComponent();
        }

        private void Button_Click(object sender, RoutedEventArgs e)
        {
            SharePointWCFServiceReference.CustomServiceClient svc = new SharePointWCFServiceReference.CustomServiceClient();
            svc.GetTimeCompleted += new EventHandler<SharePointWCFServiceReference.GetTimeCompletedEventArgs>(svc_GetTimeCompleted); svc.GetTimeAsync(); } void svc_GetTimeCompleted(object sender, SharePointWCFServiceReference.GetTimeCompletedEventArgs e)
        {
            txtfrommoss.Text = e.Result.ToString ();
        }
    }
}

In the above code snippet we are creating  the instance of WCF Serviceclient class and Invoking  the WCF Method. In Silverlight Application the service calls are made as Asynchronous calls. To call GetTime Method  in asynchronous we need to add event Handler for the GetTime Mehtod.

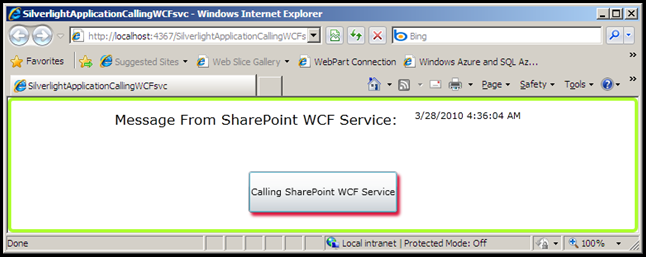
Now Hit F5 and test the app.

image 


Nandri(Thanks)


Sreenivasaragavan

Hosting WCF Service Inside SharePoint 2010

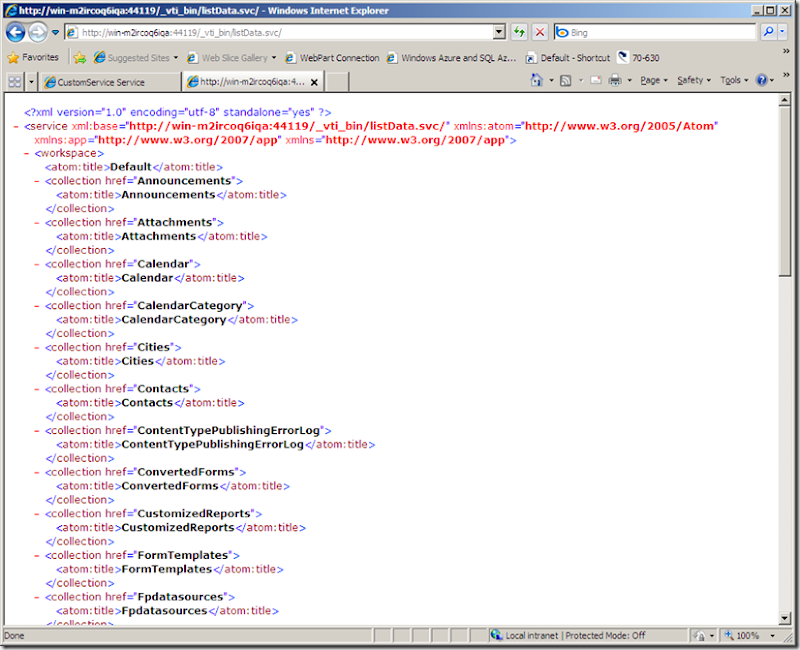
In SharePoint 2010  Out of the box all the Lists are exposed as WCF Restful Service using OData Protocol. Here is path or URL to access SharePoint Lists WCF Restful Services .   http://ServerName/_vti_bin/ListData.svc. The following screenshot shows the collections of List from my SharePoint site.

image

In this blog post  we are going to see how to host Custom WCF service Inside SharePoint 2010 and we will consume the same service from Silverlight client . Up front we know that we are going to call this WCF service from Silverlight so i am going to host this service in basicHttpBinding.

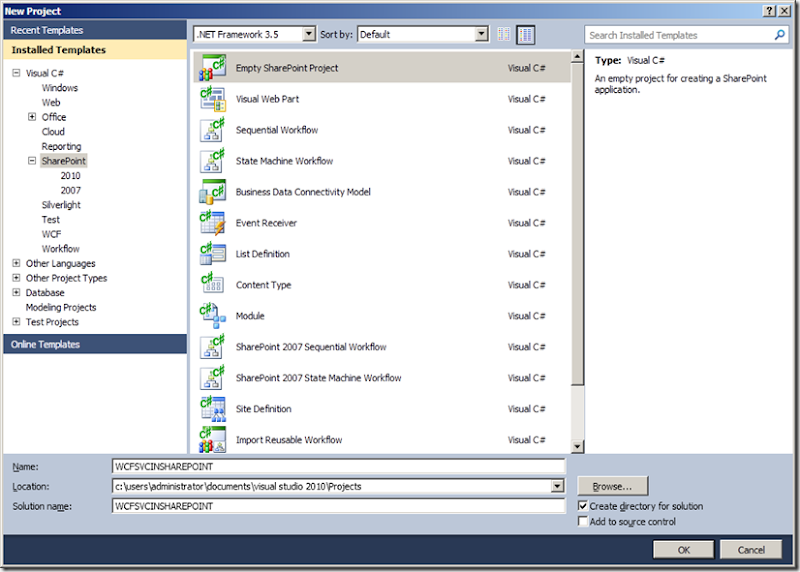
First  create a empty SharePoint project.

image

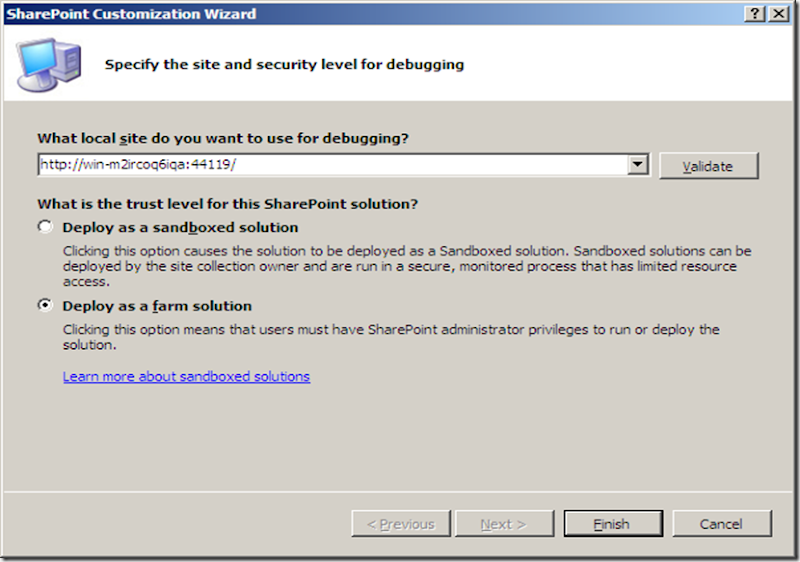
Now we need to provide the site where you wanted to host this WCF service and how we are going to deploy it either SandBox or Server Farm.  Here  i am going to choose Farm solution.

image

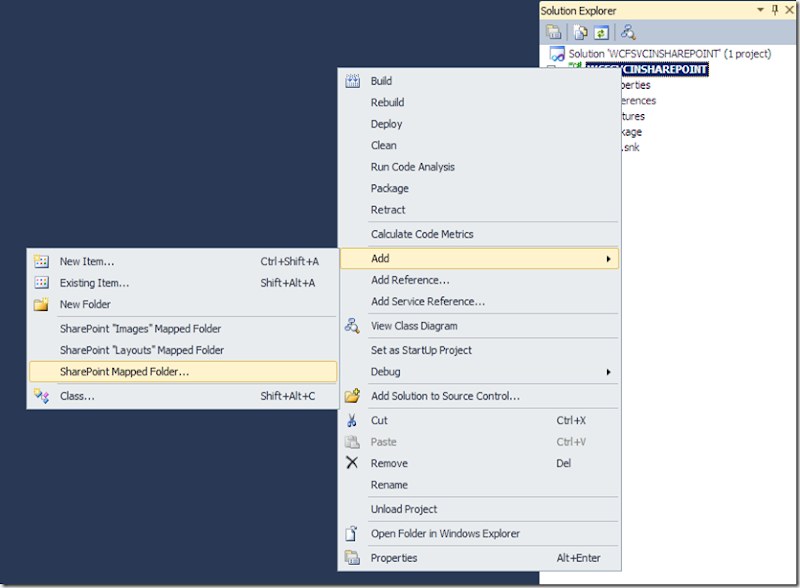
Once the project is successfully created. Now we need to Add  SharePoint ISAPI Mapping folder. To do this right clicking the project and choose the SharePoint Mapped Folder as shown below.

image

Adding /Mapping SharePoint  ISAPI Folder.

image

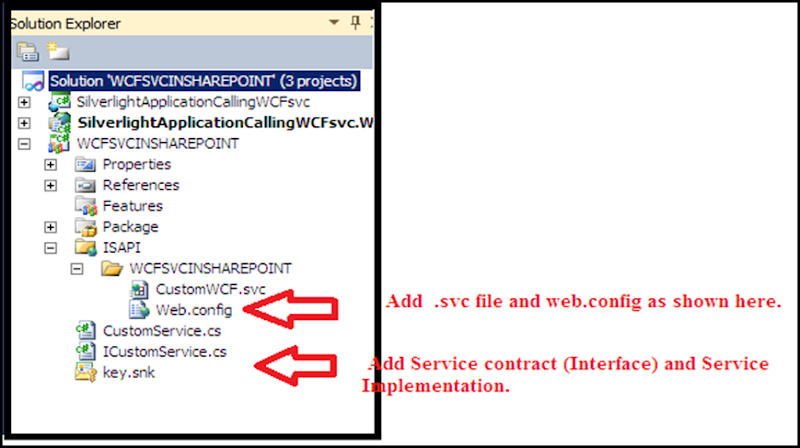
Now add C# Interface file and Class File to define the WCF Service Contract and Service implementation.  and also we need to add .svc and web.config file to host the service.

image

Simple WCF Service Contract:

using System;
using System.Collections.Generic;
using System.Linq;
using System.Runtime.Serialization;
using System.ServiceModel;
using System.Text;
using Microsoft.SharePoint;

namespace WCFSVCINSHAREPOINT
{
[ServiceContract]
public interface ICustomService
{
[OperationContract]
string GetTime();
}
}


Service Implementation 


using System;
using System.Collections.Generic;
using System.Linq;
using System.Runtime.Serialization;
using System.ServiceModel;
using System.Text;
using Microsoft.SharePoint;
using System.ServiceModel.Activation;

namespace WCFSVCINSHAREPOINT
{
[ServiceBehavior]
[AspNetCompatibilityRequirements(RequirementsMode = AspNetCompatibilityRequirementsMode.Allowed)]
public class CustomService : ICustomService
{
public string GetTime()
{
return DateTime.Now.ToString();
}

}
}


.SVC file


image


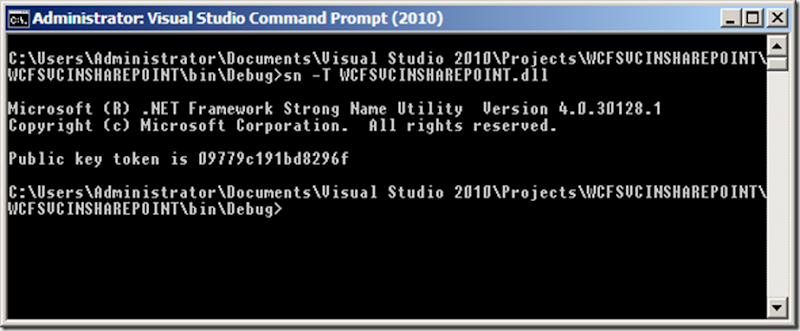
You can use .NET Reflector to get the following ServiceHost attributes PublicKeyToken , Assembly Type name, Version. But i  used the   Strong name  (SN.EXE ) Utility to get all the above attributes . Here is the sample how to use SN.EXE


image


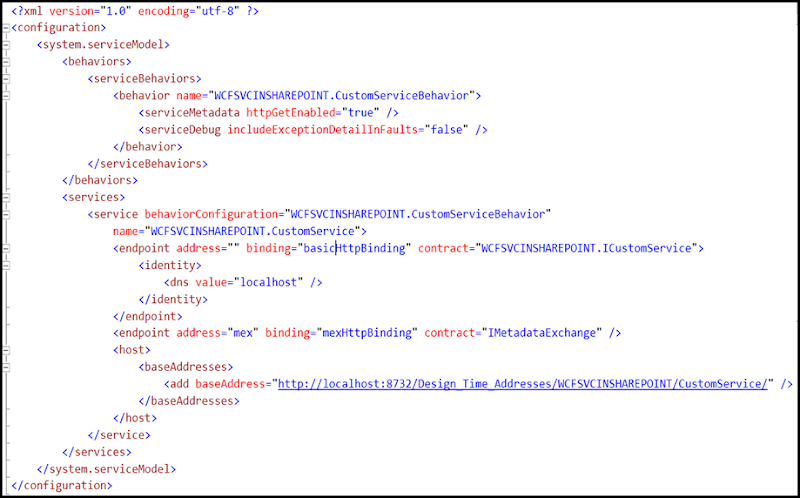
Web.Config file


image


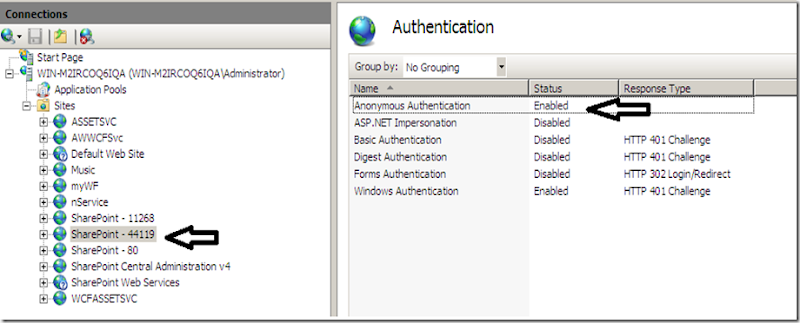
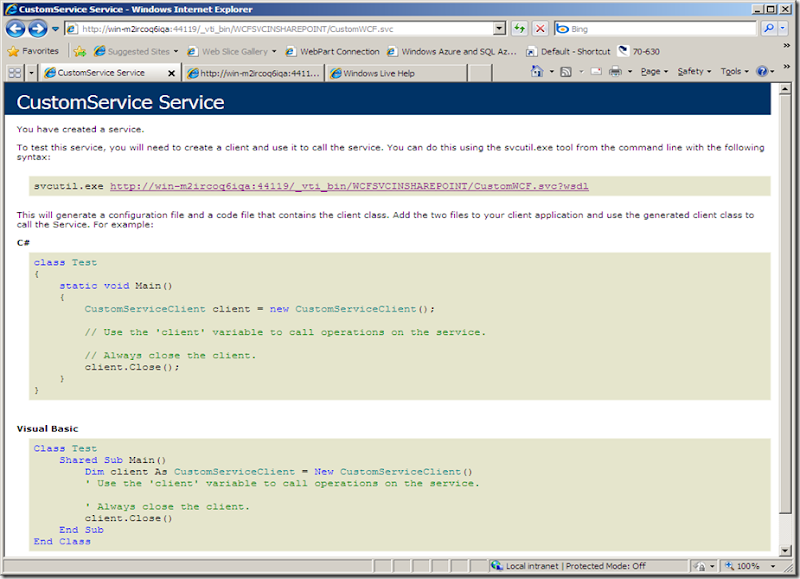
Now Fire up the IE and Browse the WCF Service. [Note: Make sure that your SharePoint Site has Anonymous access as  Shown below.]


image


image


Next Blog post we will see how to call this Service from Silverlight Client.


Nandri(Thanks)


SreenivasaRagavan

Sunday, March 21, 2010

Building a Windows 7 Phone Weather Application Using SilverLight

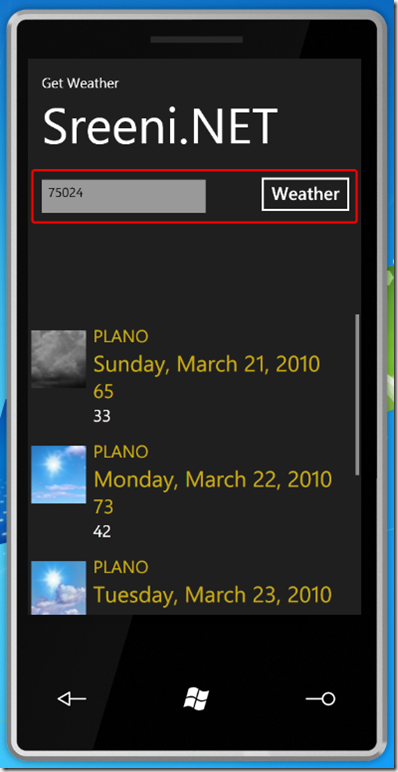
This WP7 application takes Zip code as a input from user and calls the Web Service (.ASMX) using HTTP-GET. In this CTP SDK bits we can not add Service Reference to the  project so here we are going to use WebClient class to invoke the Web Service and get the Response as XML string  then using LINQ TO XML we are going to parse the XML . Here is the look and feel of the WP7 Weather application  once we finish building this.

To get weather information by Zip code i am using the following  XML Web Service.

http://www.webservicex.net/WeatherForecast.asmx its free.

image

Steps to Create this application.

  1. Create New Windows Phone 7 application project
  2. Build UI using XAML code.
  3. Get Input from user and call the .ASMX Web service (HTTP-GET)
  4. Get the Response and Parse it and create UDT ( User Defined Type which stores XML Data).
  5. Bind UDT to List BOX.

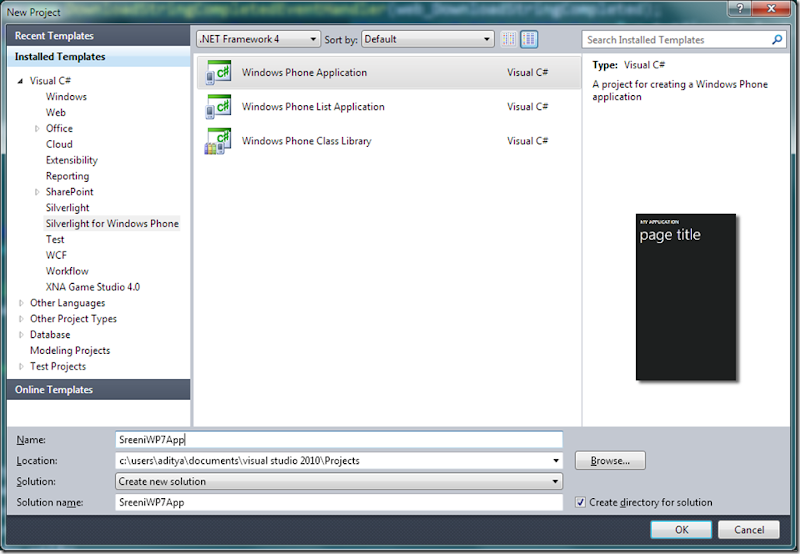
First Create New Windows Phone 7 application .

image

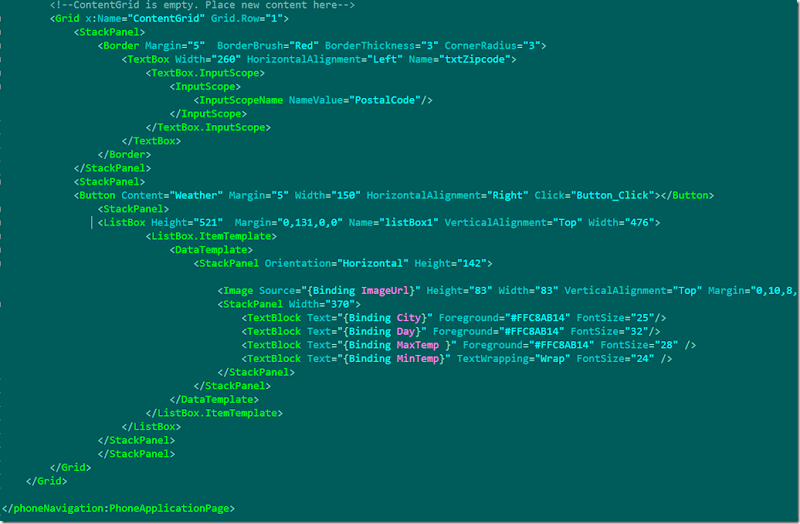
Here is the XAML code for the above Weather Apps GUI.

 image

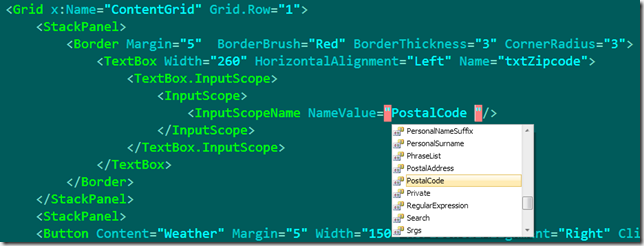
Here i am using InputScope property of Text Box to show only numeric keyboard when user enter Zip code in Textbox. Here i am setting Inputsopename NameValue to PostalCode.

image

image

Create the UDT ( User Defined Type) class with the following properties to store XML Weather Data as a .NET Type. 

image

In Windows Phone 7 application project  right now we can not add Service Reference so we are going to use WebClient class to invoke the web service. This is Siliverlight application so we need to invoke the Web Service method as Asynchronous call .

image

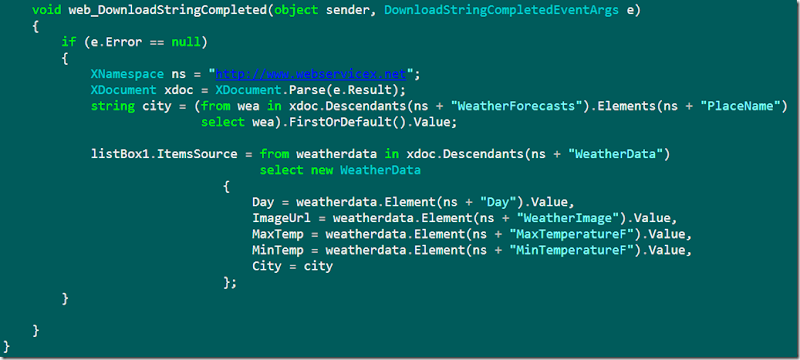
Once we get the response from Weather WebSerice we are going to use LINQ TO XML to parse the XML data and create the WeatherData UDT type. [ NOTE :We need to add System.Linq.Xml Assembly as reference to our project to parse XML using LINQ]. Once we parse the XML we are setting result to Listbox Itemsource property.

image

image

Nandri(Thanks)

SreenivasaRagavan

Saturday, March 20, 2010

Windows Azure – BLOB Storage

What is BLOB ? –

Binary Large OBjects.

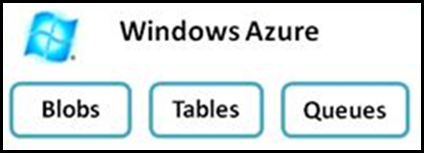
Windows Azure basically provides 4 type of storages

1) BLOB

2) Tables

3) Queues

image

4) Drive ( This is new) – NTFS drive.

In this Blog post i am going to use BLOB storage to store Binary Objects like  Images , Videos , etc..

Blobs can be used to store data that is unstructured. Windows Azure account holder  can create one or more containers to store related collections of blobs. Containers can be setup as either private or public. If a container is setup as public than any internet user will be able to read the blobs contained within it using the proper URL. If a container is marked as private than the secret key that comes with a Windows Azure storage account will be needed to access the blobs within the container. Additionally, if a single Blob is very large then Windows Azure provides tools to break up these large blobs into blocks so that they may be transferred to Windows Azure Blob storage more efficiently.

image  

image

Container Rules

  1. Container name must be a valid Domain Name System (DNS) name, conforming to the following naming rules.
  2. Must start with a letter or number, and can contain only letters, numbers, and the period (.) and dash(-) characters.
  3. All letters must be lowercase.
  4. Must be from 3 to 63 characters long.
  5. A name cannot contain a dash next to a period.

The following screenshot shows the Methods of my Windows Azure Service project .Now we are going to create these methods and we will be using in ASP.NET Web UI to Upload  the BLOB into Azure Storage. [Note: Here i am using my local Development Fabric ]

image

Here is the ASP.NET Web UI for this application.

 image

First Run VS.NET 2010 as an Administrator  and then create Cloud service project .

image

Now add ASP.NET Web Role to it. Open of Default.aspx Code behind file and  Create  CloudBlobClient private variable we will be using more often this.

InitBlobAccess:

This method Create a Local windows Azure Blob storage.

image

CreateContainer:

This method will create a container and set the access permission as public . [By default Windows Azure Blob storage permission is private. ]

image

DeleteContainer:

This method delete the container by given name.

image

ListBlobContainers:

This method  returns all publicly accessible[ permission] containers.

image

ListBlob:

This method returns a List of all available Blobs for selected (given) container in Dropdown List.

image

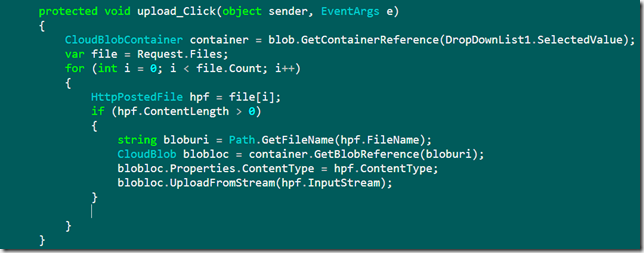
Upload File:

This method will enumerate all the uploaded file and load the content into Selected container and create the Blob in Windows Azure Blog Storage. 

image

Now wire up the above methods with ASP.NET WEB UI and upload the BLOB content and test it.

image

For more on Blob please visit http://blogs.msdn.com/windowsazure/archive/2009/11/25/windows-azure-storage-at-pdc-2009.aspx

Nandri(Thanks)

SreenivasaRagavan.

Friday, March 19, 2010

Windows Azure – How to Use Table Storage.

I am going to create a Windows Azure Application which uses Table Storage to store my TODO Lists or TASKS.  Windows Azure Table Storage is Semi Structured and Query able  Table Storage and its a collections of Entities. These Entity have Primary key and set of Pre defined property.

Windows Azure Table service has two key properties: PartitionKey and the RowKey. These properties together form the table's primary key and uniquely identify each entity in the table. Every entity in the Table service also has a Timestamp system property, which allows the service to keep track of when an entity was last modified. This Timestamp field is intended for system use and should not be accessed by the application.

Table service does not enforce any schema for tables, which makes it possible for two entities in the same table to have different sets of properties.

Steps to create Windows Azure Table Storage.

1) Create Entity Class which is derived from TableServiceEntity.

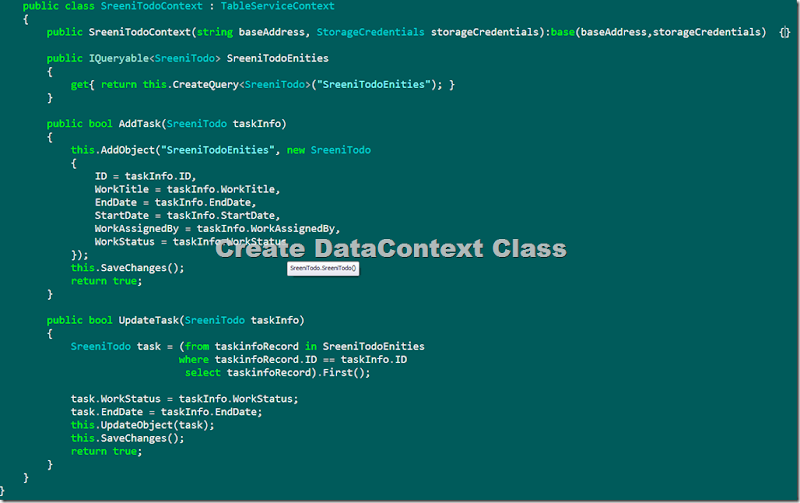
2) Create a DataContext class which is derived from TableServiceContext, which itself derives from DataServiceContext.

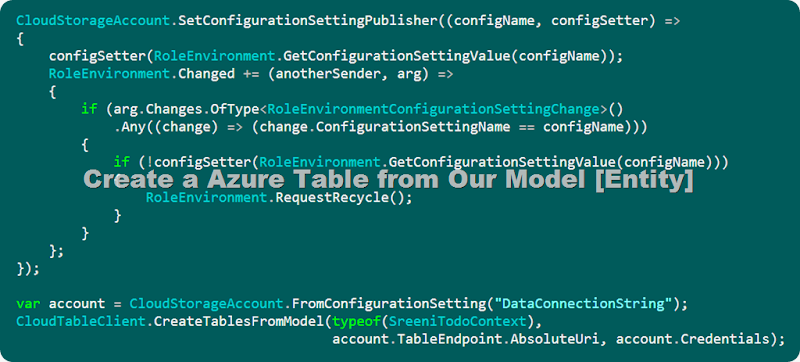
3) Create Windows Azure Table Storage from our Model ( That is our Entity Class).

4) Test it with Local Development Fabric.

5) Publish to windows Azure ( Need to have account ).

Start (Run) VS.NET as an Administrator  and create the  new Cloud service project.
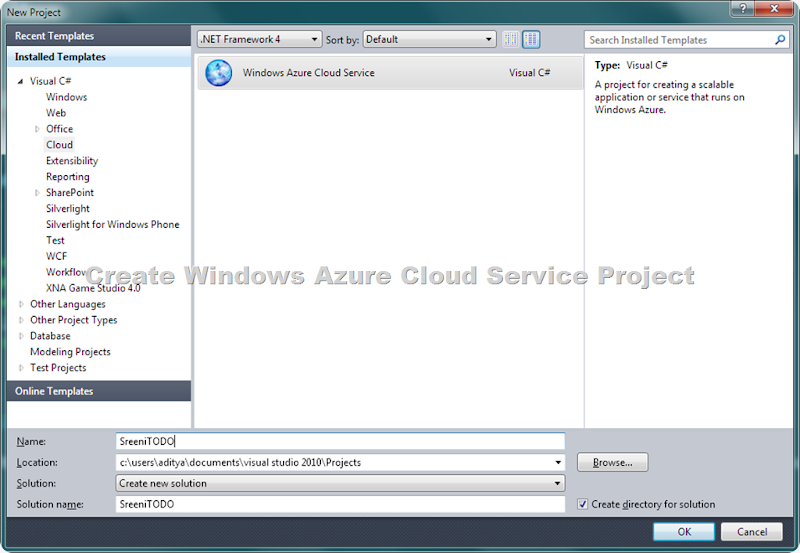
image

Add ASP.NET Web Role. All Web Role needs IIS to run. so we are basically developing ASP.NET Web application .
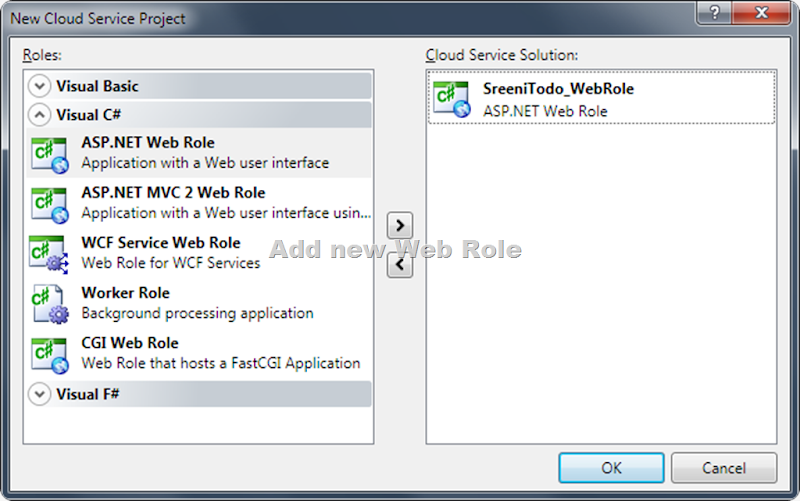
image

Now add class Template to the project to create our Entity Schema. Which is going to be Model Structure for our Windows Azure Table Storage. This SreeniTodo class defines the PartititionKey, RowKey and TimeStamp system properties required by every entity stored in a Windows Azure table
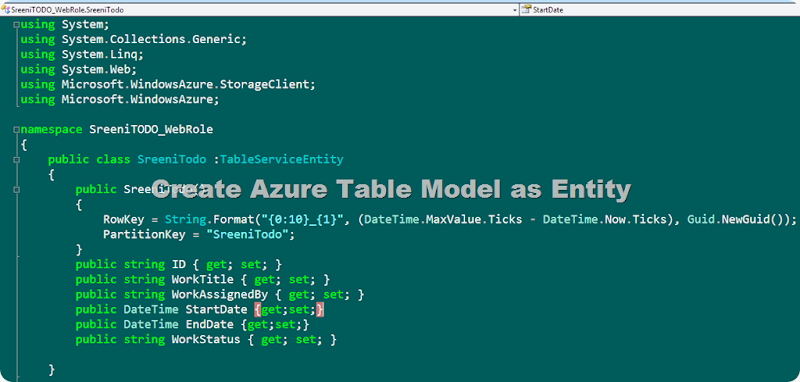
image

Create Data Context

image

image

image

DataConnectionString: This is the connection string to the Window Azure account, through which we can programmatically access data storage and other functionalities in Windows Azure. This connection string can point to a Windows Azure Account in the cloud as well as local development fabric.

image

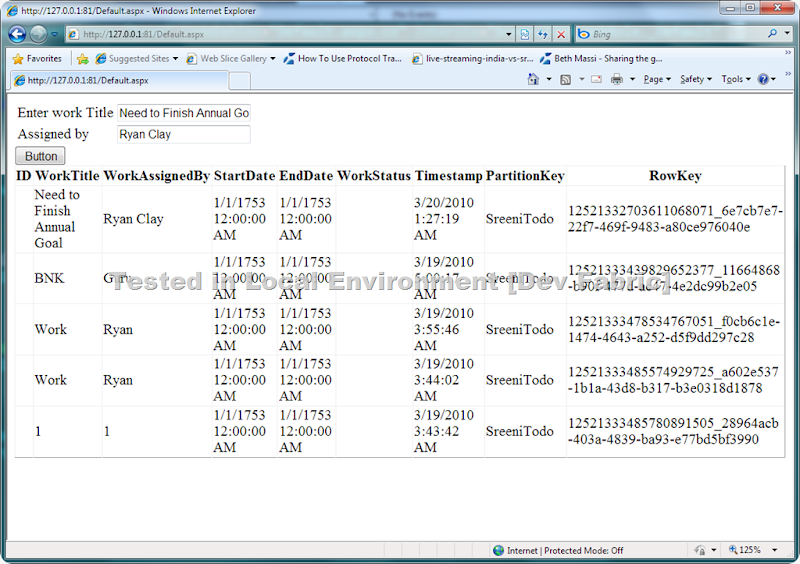
Create a User interface to input the Entity  property filed , for sample i am getting only  Work Title and Assigned by
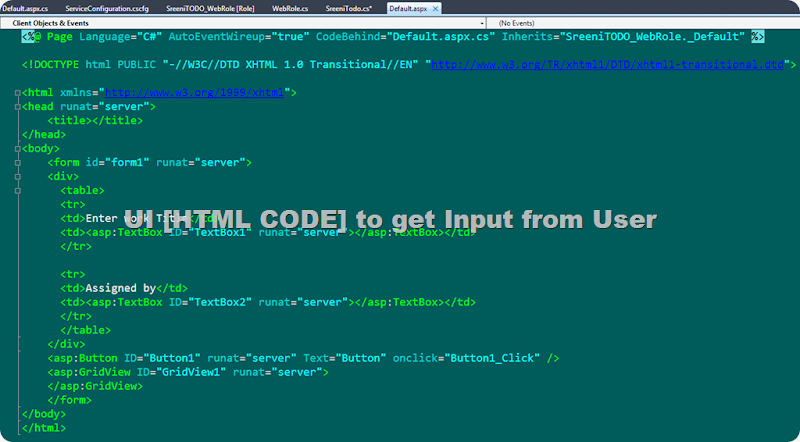
image

image

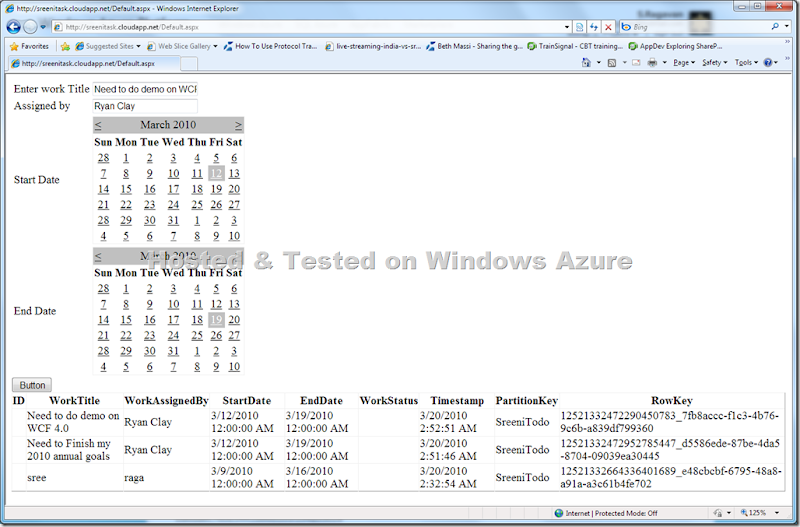
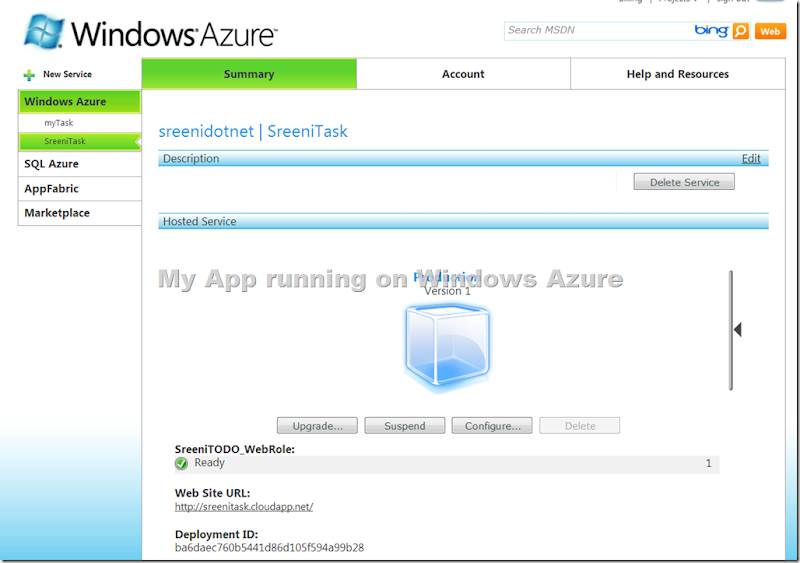
Once tested in Local Environment now time to publish to Windows Azure. Right click on Project and click publish. logon to your windows azure account create new service and select  Package and Configuration file to deploy.

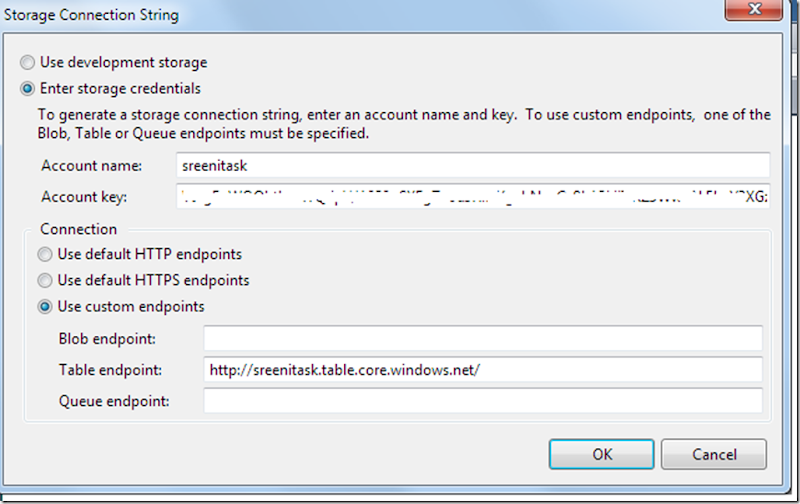
Now change the Azure storage settings as shown below.

We initially ran our application to point to our local Development Storage. Now we need to point our application to Windows Azure Account.
image

image

image

Next we will see how to use other window Azure Storages Blob and Q .
Nandri(Thanks)

SreenivasaRagavan.